Showing posts with label My Crochet. Show all posts

My Crochet - Bicycle Vase

This was an amigurumi that i just made. The idea was from the vase that i saw in the mall. It's just a simple vase but the price is so expensive, so that's why i wanted to make my own crochet bicycle vase . Then I searched the picture on google and tried to apply it into crochet.

my bicycle vase

The vase was finished yesterday, but i need to make one more bicycle to check my pattern.
The pattern will be available on my blog as soon as i finish my second bicycle. I hope you can be patient in waiting my pattern :D
You can find the pattern here

my idea from google

I needed several days to make this vase into a complete bicycle. Even it's not a perfect one, but i  satisfied with my job :D

unfinished bicycle
Beside it can be used as vase, this bicycle also can be used as mobile phone holder or pencil holder.

Amigurumi Christmas Tree

I love Christmas tree. That's why I share this pattern to you who celebrate Christmas. This free amigurumi pattern tree is so easy to crochet. You can add crochet chain on the top of this tree to hang it on your "real" Christmas tree. Just try this pattern, and I'll be glad if you share your amigurumi using this pattern to me. Happy Crocheting!! 
Materials needed:
Yarn in dark green, white and brown
2 mm crochet hook
Polyester fiberfill
Stitch marker for working in the round
Needle for sewing
Beads in various colors
Scissors

Abbreviations:
sc = single crochet
inc = increase
dec = decrease
sl st = slip stitch
dc = double crochet
hdc = half double crochet
r = round
BLO = back loops only
FO = fasten off
CC = change color

Note: This project is working in continuous rounds. Mark first stitch of each round.

Trunk:
Using brown yarn
R1: ch 2, starting from second chain from hook 6 sc
R2: inc, rep 6x (12)
R3: sc, inc, rep 6x (18)
R4: Work in BLO sc around (18)
R5-6: sc around
R7: dec, 4 sc, rep 3x (15)
R8: sc around
Stuff
F/O leave a long tail for sewing

Tree:
Using dark green and white
R1: ch 2, starting from second chain from hook 6 sc
R2: inc, sc, rep 3x (9)
R3: inc, 2sc, rep 3x (12)
R4: sc around
R5: inc, 3sc, rep 3x (15)
R6: sc around
R7: inc, 4sc, rep 3x, (18)
R8: sc around
R9: 2sc, inc, rep 6x (24)
R10: sc around
R11: 3sc, inc, rep 6x (30)
R12: Work in BLO sc around
R13-14: sc around
R15: 4sc, inc, rep 6x (36)
R16: sc around
R17: Work in BLO sc around
R18-19: sc around
R20: Work in BLO, sc around
R21: 4sc, dec, rep 6x (30)
R22: 3sc, dec, rep 6x (24)
R23: 2sc, dec, rep 6x (18)
Stuff the tree
R24: sc, dec, rep 6x (12)
R25: dec, rep 6x (6)
F/O
Sew trunk to tree before we continue the next steps. See the picture below.
Then we continue crochet next round, starting from the first front loop of R19.
R26: sc arund (36)
R27: 5sc, inc, rep 6x (42)
R28: sc around
R29: (*ch1, skip 2 st, 5dc, skip 2 st, sl st), rep * 7x, (now you have 7 shell stitches)
CC to white
R30: (*sl st to the same st of R28 that u made in R29, 2sc, inc, 2sc), rep * around
R31: Using green, working in front loop of R11, (*ch1, skip 2 st, 5dc, skip 2 st, sl st), rep * 5x (5 shell stitches)
R32:  CC to white, (*sl st to the same st of R11 that u made in R31, 2sc, inc, 2sc), rep * around
R33: Using green, workin in front loop of  R16, (*ch1, skip 2 st, 5dc, skip 2 st, sl st), rep * 6x (6 shell stitches)
R34: CC to white, (*sl st to the same st of R16 that u made in R33, 2sc, inc, 2sc), rep * around
F/O
Your Christmas tree will be like this

Star:
Using yellow yarn
R1: ch 2, starting from second chain from hook 5 sc
R2: 4ch, sl st in the  second chain from hook, sc, hdc, sl st, rep 5x
F/O leaving long tail for sewing


Finishing:
- Sew the star on the top of tree
- Sew various colors of beads to the tree as many as you like.

Now You have finished your Christmas tree. I hope you like it....
This free amigurumi Christmas tree pattern is made by me, Zan Merry. Don’t reprint it to your site or blog. You can post the ami that you made from my pattern to your blog, forum or social media, but please link me as a designer.
You can sale the ami that you’ve made from this pattern but not the pattern. If I made a mistake when wrote this pattern, please leave a comment so i can edit it. Thanks

Tablecloth

I really love this tablecloth. It's combination between filet and round granny. It's very easy to make, simple and beautiful. I made this table cloth using cotton yarn, and needed about 200gr white yarn and 100gr purple yarn.

I will share the pattern here so you can try to make it too.

Pola 1

Using pattern 1 above , I made 6 motif with white yarn.

 Then I continued make 28 purple round granny by using pattern 2. I skipped the last round for next step.

Here is the pattern.
pola 2


I joined the purple rounds to the filet by using white yarn. Use the last step of pattern 2 to join them. Join them all.

And it's ready now.


My Crochet - Tutup Galon dan Tas-

Sebenarnya pola ini adalah hasil motif yang aku temukan di FB tapi aku lupa dari FB siapa aku ngambilnya... maklum kl aku save pola ga pernah save juga sumbernya dari mana :D


Ini adalah contoh hasil karya ku yang aku buat dengan motif yang aku temukan di internet. Pertama tutup galon. Bikin nya ga ribet dan juga ga menghabiskan banyak benang... kalo ga salah cuma butuh satu setengah gulung benang katun lokal aja. Ngerjainnya pun ga lama... cuma 2 hari aja. Cuma pada tutup galon ini aku hanya menambah jumlah chain pada motif nya... soalnya kl ngikutin pola hasilnya jadi agak mengecil. Tapi selebih nya semua sama dengan pola nya. 


Selain tutup galon, aku juga bikin tas dengan menggunakan motif ini juga dan hasilnya cukup bagus juga.


Nah sekarang giliran kamu nih yang berkreasi dengan menggunakan motif ini :)

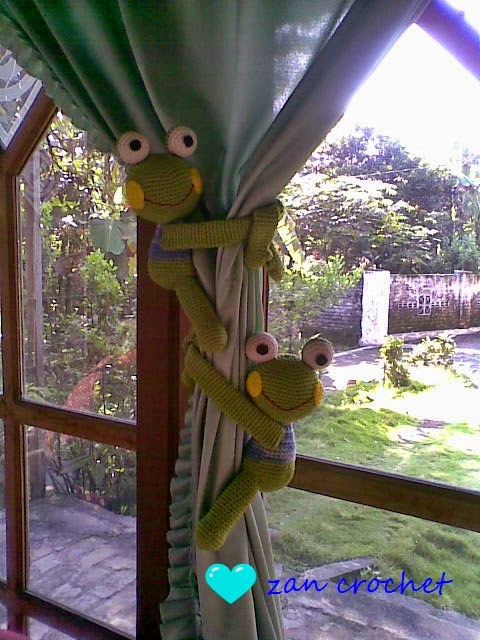
Frog curtain Tie Back

I really love these frogs.. They are so cute.. The pattern is so easy to follow... You can decor your home using this frog...  I hope you will love this frog too...
Please join my page on Facebook  Zan Amigurumi and share your creation from this pattern there...
Happy crocheting...
For Dutch Version click here

Materials needed:
Yarn in green, white, blue, yellow and red
crochet hook
Polyester fiberfill
Needle for sewing
Marker
Black felt for making eyes
Glue
Scissor

Abbreviations:
sc = single crochet
inc = increase
dec = decrease
sl st = slip stitch
R= round
CC = change color
F/O = fasten off
DCC: double crochet cluster
How to make dc cluster


Note: This project is working in continuous rounds.  Mark first stitch of each round

Head:
Using green
R1: ch 2, starting from second chain from hook 6 sc
R2: inc, rep 6x (12)
R3: sc, inc, rep 6x (18)
R4: 2sc, inc, rep 6x (24)
R5: 3sc, inc, rep 6x (30)
R6: 4sc, inc, rep 6x (36)
R7: 5sc, inc, rep 6x (42)
R8: 6sc, inc, rep 6x (48)
R9: 7sc, inc, rep 6x (54)
R10: 8sc, inc, rep 6x (60)
R11-18: sc around (60)
R19: 8sc, dec, rep 6x (54)
R20: 7sc, dec, rep 6x (48)
R21: 6sc, dec, rep 6x (42)
R22: 5sc, dec, rep 6x (36)
R23: 4sc, dec, rep 6x (30)
R24: 3sc, dec, rep 6x (24)
R25: 2sc, dec, rep 6x (18)
Stuff
F/O

Eyes (make 2):
Using white
R1: ch 2, starting from second chain from hook 6 sc
R2: inc, rep 6x (12)
R3: sc, inc, rep 6x (18)
R4: 2sc, inc, rep 6x (24)
R5: sc around
CC to green
R6-7: sc around
R8: 2sc, dec, rep 6x (18)
R9: sc, dec, rep 6x (12)
Stuff
R10: dec, rep 6x (6)
F/O leave long tail for sewing

Body:
Using green
R1: ch 2, starting from second chain from hook 6 sc
R2: inc, rep 6x (12)
R3: sc, inc, rep 6x (18)
R4: 2sc, inc, rep 6x (24)
R5: 3sc, inc, rep 6x (30)
R6: 4sc, inc, rep 6x (36)
R7: 5sc, inc, rep 6x (42)
R8: 6sc, inc, rep 6x (48)
R9-11: sc around
R12:  6sc, dec, rep 6x (42)
R13: sc around
CC to blue

R14: 5sc, dec, rep 6x (36)
R15-16: sc around
R17:  4sc, dec, rep 6x (30)
R18: sc around
R19:  3sc, dec, rep 6x (24)
R20-22: sc around
R23:  2sc, dec, rep 6x (18)
R24: sc around
Stuff
F/O leave long tail for sewing

Hands (make 2):
Using green
R1: ch 2, starting from second chain from hook 6 sc
R2: inc, rep 6x (12)
R3: sc, inc, rep 6x (18)
R4: sc around
R5: 7sc, dec, rep 2x (16)
R6: 6sc, dec, 6sc, dcc (see diagram above how to make it), sc (15)
R7: 13 sc, dec (14)
Stuff with little polyester fiberfill
R8-63: sc around
Don't stuff the hands
F/O leave long tail for sewing

Legs (make 2):
Using green
R1: ch 2, starting from second chain from hook 6 sc
R2: inc, rep 6x (12)
R3: sc, inc, rep 6x (18)
R4: 2sc, inc, rep 6x (24)
R5-7: sc around
R8: 2sc, dec, rep 6x (18)
R9-25: sc around
Stuff
F/O leave long tail for sewing

Blush Circles (Make 2):
Using yellow
R1: ch 2, starting from second chain from hook 6 sc
R2: inc, rep 6x (12)
R3: sc, inc, rep 6x (18) + sl st
F/O leaving long tail for sewing

Assembly:


- sew the frog's eyes on the head
- Cut out 2 black felt and glue them onto frog's eyes with some fabric glue.
- Sew the blush to the frog's head
- Sew the mouth between the blushes with red yarn
- Sew the body to the head
- Sew the hands and the legs to the frog's body (see the picture below for the position of the hands and legs)
- Add red ribbon to the body (optional)

 And congratulation you've completed your amigurumi frog curtain tie back.

This pattern is made by me, Zan Merry. If you wish to share this pattern, you may link this pattern but please do not reprint it to your site. You may keep a copy of this pattern for personal use but you may not sell this pattern. You can sell the items that you made from this pattern as you credit me as the designer.

Please leave comment if you have a question or you can email me to cintaku.zanee@gmail.com

If you find some mistake in my  pattern, please tell me... I will do the corrections. I will be happy to see your creation from this pattern so please share your handmade to me...

Donald Duck

Ini salah satu amigurumi favorite saya, karena membuat nya pun dengan penuh perjuangan... Kendala nya dibahasa tentunya karena walaupun pola yang saya dapat adalah pola gratisan tapi pola tersebut menggunakan bahasa spanyol..


Tapi untung nya setelah 2 hari di buat cenut2 sama pola ini akhir nya jadi juga amigurumi Donal nya... Wah rasa nya itu loh saat melihat nya dah jadi seneeenggg bgt... Puas rasanya melihat hasil karya buatan sendiri hehehehe... yang mau buat juga silahkan donlot pola nya. Aku sih dapat pola nya disini


Bear's Family


Aren't they so cute? I love them very much... I made them as a request of my childhood friend. She asked me to make Bear's family (father, mother and their son).


She also asked me to add the clothes to the bears, but not permanent clothes, so she could change or wash the clothes.

The father and mother were made using the same pattern, but the pattern of the son's different.


I wrote and designed the pattern, but I'm sorry if i can't share the pattern in my blog. I hope these bears can give you inspiration.

My Tweety


Siapa sih yang tidak tahu dengan tokoh karun tweety...?  Burung kenari kuning lucu milik granny yg tinggal dalam sangkar dan selalu jadi sasaran mangsa si silvester. Tweety selalu untung saat dijaga oleh Hector yang tinggal di tempat Granny. Sebenarnya aku ga terlalu suka tokoh Tweety, karena aku adalah cat's lover, jadi gimana jahatnya silvester aku tetap suka nya sama silvester bukan tweety.. :D


Sebelum nya aku pernah bikin amigurumi tweety dengan ukuran agak besar, sekitar 26 cm. Pola nya ku dapat dari teman yang membagikan nya secara gratis di grup FB, tapi saat aku mencoba polanya aku merasa ga "sreg" dengan hasil nya... Ntah yang salah dimana, apa kah aku yang salah hitung ataukah yang bikin pola yang salah bikin pola... Upsss... :D yang jelas aku merasa hasil buatan ku lebih mirip tweety alien. :(  tapi saat aku posting gambar nya di fb orang-orang pada suka...

Sampai akhirnya taraaaa....ada seseorang yang memintaku untuk mebuatkannya Tweety dengan ukuran 10 cm buat dijadikan gantungan hape.. Awal nya aku ga yakin dengan hasil jadinya karena membuat ami tweety itu tidak lah mudah. Dan setelah aku "mojok" dengan benang dan jarum, jadi juga tweety nya tapi tinggi nya 2 atau 3 cm lebih tinggi dari yang diminta... tapi syukurlah yang pesen tidak mempersalahkan nya. Dia pun puas dengan hasilnya.. satu lagi permintaan nya, dia minta kalau tweety nya di buat versi cewek yang imut.. Dan inilah hasil dari buatanku....


Dengan menambahkan baju berwarna pink dan pita kecil di kepala nya tweety ku jadi terlihat sangat cewek kan? :D
 
Rencana nya sih pola nya akan kubagikan secara gratis di blog ku ini, tapi nanti ya setelah pola nya dah siap aku buat. soalnya sekarang msh berupa angka-angka yang aku sendiri yang mengerti maksud nya. :D

WAIT FOR THE PATTERN, I Will post in my blog as soon as the pattern ready. 
The pattern is ready. You can find it here

Kura-kura...


Turtle alias kura-kura lucu dan unik... asli buatan tangan dengan teknik crochet. Sangat cocok dijadikan gantungan kunci, gantungan HP, souvenir pernikahan, dan lain nya... Mau dijadikan apapun tetap cute kok... :) 
Buat pola amigurumi kura-kura silahkan klik Turtle Girl (pola dalam bahasa Inggris)

sealkazzsoftware.blogspot.com resepkuekeringku.com