Showing posts with label Bunny. Show all posts

Sweet Bunny


Abbreviations:
sc: single crochet    
ch: chain
St: Stitch
inc : increase
dec: decrease
dc: double crochet
dc-inc: double crochet increase (2 dc in a stitch)
Sl st : slip stitch
F/O: Fasten off


Materials:
3 mm crochet hook
yarn in pink, dark pink, yellow, green
Needle for sewing
Stuff
Scissors
10 mm safety eyes

Note: work in continuous round

Head:
Use pink
R1: ch 2, starting from second chain from hook 6 sc   (6)
R2: inc, rep 6x (12)
R3: sc, inc, rep 6x (18)
R4: sc, inc, [2 sc, inc = rep 5x], sc (24)
R5: 3 sc, inc, rep 6x (30)
R6: 2 sc, inc, [4 sc, inc = rep 5x], 2 sc (36)
R7: 5 sc, inc, rep 6x (42)
R8: 3 sc, inc, [6 sc, inc = rep 5x], 3 sc (48)
R9: 7 sc, inc, rep 6x (54)
R10:  4 sc, inc, [8 sc, inc = rep 5x], 4 sc (60)
R11-17: sc around
Attach safety eyes between R14  and R15, give space 10sts.
R18: 4 sc, dec, [8 sc, dec = rep 5x], 4 sc (54)
R19: 7 sc, dec, rep 6x (48)
R20: 3 sc, dec, [6 sc, dec = rep 5x], 3 sc (42)
R21: 5 sc, dec, rep 6x (36)
R22: 2 sc, dec, [4 sc, dec = rep 5x], 2 sc (30)
R23: 3 sc, dec, rep 6x (24)
R24: 2 sc, dec, rep 6x (18)
stuff
R25: sc, dec, rep 6x (12)
R26: dec, rep 6x (6)
F/O

Body:
Use pink
R1:  ch 2, starting from second chain from hook 6 sc   (6)
R2: inc, rep 6x (12)
R3: sc, inc, rep 6x (18)
R4: sc, inc, [2 sc, inc = rep 5x], sc (24)
R5: 3 sc, inc, rep 6x (30)
R6:  2 sc, inc, [4 sc, inc = rep 5x], 2 sc (36)
R7:  5 sc, inc, rep 6x (42)
R8-11: sc around
R12: CC to green, 5 sc, dec, rep 6x (36)
R13: CC to yellow, BLO, sc around
R14: sc around
R15:  4 sc, dec, rep 6x (30)
R16-18: sc around
R19: 3 sc, dec, rep 6x (24)
R20-21: sc around
R22: 2 sc, dec, rep 6x (18)
R23-24: sc around
stuff
F/O leaving a long tail for sewing
Continue making skirt
Work in front loop of  R12
R1: ch 2, 5 dc, dc-inc, rep 6x (42), sl st to the first st
R2: ch 2, 6 dc, dc-inc, rep 6x (48), sl st to the first st
R3: ch 2, 7 dc, dc-inc, rep 6x (54), sl st to the first st
R4: ch 2, dc around
R5: CC to dark pink, ch 2, sl st, repeat around
F/O

Arms (make 2):
Use pink
R1: ch 2, starting from second chain from hook 6 sc   (6)
R2: inc, rep 6x (12)
R3: 3 sc, inc, rep 3x (15)
R4-5: sc around
R6: 4 sc, [dec = 3x], 5 sc (12)
R7: 4 sc, [dec = 2x], 4 sc (10)
Isi dakron
R8-14: sc around
R15-20: CC to yellow, sc around
Stuff. 
R8: dec, rep 5x (5)
F/O leaving a long tail for sewing

Legs (make 2):
Use yellow
R1: ch 6, starting from 2nd chain from hook, 4 sc, 3 sc in last st, continue your work st around the other side of chain, 3 sc, 2 sc in last st. (12)
R2: inc, 3 sc, [inc = 3x], 3 sc, [inc = 2x] (18)
R3: 5 sc, [inc = 6x], 7 sc (24)
R4: sc around
R5: 6 sc, [dec= 6x], 6 sc (18)
R6: 3 sc, [dec = 6x], 3 sc (12)
R7: CC to pink, BLO, sc around
stuff
R8-17: sc around
Stuff
F/O leaving along tail for sewing

Ears (make 2):
Use dark pink
R1: ch 2, starting from second chain from hook 6 sc   (6)
R2: inc, rep 6x  (12)
R3: sc around
R4: sc, inc, rep 6x (18)
R5-6: sc around
R7: 2 sc, inc, rep 6x (24)
R8-11: sc around
R12: 4 sc, dec, rep 4x (20)
R13-16: sc around   
R17: 3 sc, dec, rep 4x (16)
R18-19: sc around
F/O leaving along tail for sewing.


Muzzle:
Use white
R1:     ch 2, starting from second chain from hook 6 sc   (6)
R2:     inc, rep 6x  (12)
R3:     sc, inc, rep 6x (18)
F/O leaving along tail for sewing

Finishing:
- Use pink yarn to sew nose on the muzzle.
- Sew muzzle between eyes.
- Sew both ears on head.
- Sew body to head.
- Sew arms to body.
- Sew legs to bottom of body.


This pattern is an original by me, Zan Merry. Please do not claim this pattern as your own. If you wish to share this pattern, you may link this pattern but please do not reprint it to your site or share it in a pdf or picture format.

You may keep a copy of this pattern for personal use but you may not sell the pattern. You can sell the items that you made from this pattern as you credit me as the designer.

Please leave comment if you have a question or find any mistake in my pattern. I will do the corrections as soon as possible. I will be happy to see your creation from this pattern so please share your handmade to my Facebook Page Zan Amigurumi or Instagram @zancrochet

Thanks...


Macaroon Bunnies

Macaroon Bunnies Amigurumi Pattern
Pattern By Melani
Facebook: Yekkia Moniq    (https://www.facebook.com/yekkiamoniq.sayitwithcookies)
Instagram: @meilan_0811   (https://www.instagram.com/meilan__0811)


You will need:
yarn in white, pink, blue
black and pink yarn to embroider the eyes and nose
Hook suitable for the yarns.
Tapestry needle
Scissor
Polyfill

Abbreviations:
MR    : magic ring
Sc    : single crochet 
Ch    : chain
St    : stitch
Inc    : increase
Dec    : decrease
BLO    : work on back loop only
sl st    : slip stitch
F/O    : Fasten off
Rep    : Repeat
R    : Round

Note: Work in continuous rounds. 

Head
Using white
R1.    MR, sc 6    (6)
R2.    (Inc) 6x        (12)
R3.    (sc, inc)  6x    (18)
R4.    (2 sc , inc) 6x    (24)
R5.    Sc around    (24)
R6.    (3 sc, inc) 6x    (30)
R7 – 8:  Sc around    (30)
R9.    (4 sc, Inc) 6x    (36)
R10    Sc around    (36)
R11.    (5 sc, Inc) 6x    (42)
R12.    (5 sc, dec) 6x    (36)
R13.    (4 sc ,  dec) 6x    (30)
R14.    (3 sc, dec) 6x    (24)
R15.    (2 sc, dec) 6x    (18) stuff with polyfill
R16    (sc, dec) 6x    (12)
f/o leaving a long tail for sewing.

Body
Using white
R1.    MR, sc 6    (6)
R2.    (Inc) 6x        (12)
R3.    (sc, inc)  6x    (18)
R4.    (2 sc, inc) 6x    (24)
R5-8    Sc, around    (24)
R9    (2 sc, dec) 6x    (18) stuff with polyfill
R10    (sc, dec) 6x    (12)
R11    Sc around    (12)
F/O


Legs (make two):
Using white
R1.    MR, sc 6    (6)
R2.    (Inc, sc) 3x        (9)
R3-8.    Sc around    (9),
stuff
 F/O leaving a long tail for sewing

Arms (make two):
Using white
R1.    MR, sc 6    (6)
R2-8.    Sc around    (6),
stuff
 f/o leaving a long tail for sewing

Ears (make two):
Using white
R1.    MR, sc 4    (4)
R2.    (sc, inc) 2x    (6)
R3.    (2 sc, inc) 2x    (8)
R4.    (3 sc, inc) 2x    (10)
R5.    (4 sc, Inc) 2x    (12)
R6 -11    Sc around    (12)
flatten and f/o
Leaving a long tail for sewing

Note: repeat all steps above to make her couple


Dress (using pink, make one)
R1.    Ch 24 (Wrap it around the body, make more or less chains as needed), join to the first ch to make a circle
R2.    Sc around, join with sl st.
R3.    Ch 3 (count as 1st dc) + dc in same st, dc, [dc inc, dc = 11x] , join round with sl st
R4.    Ch 3, dc in each of next 35 st, join round with sl st
F/O
Continue working on the upper part.
Start making sc in 8th st of chain base, sc in each of next 9 st (10)
Ch 1, turn, sc in each sts (10)
Continue making a strap, ch 20 (wrap it around the neck, make more or less as needed), skip  5 sts for button hole and continue working from 6th st from hook, sc in each sts till the end, + sl st
F/O,  sew the button

Jumper (Using blue, make one)
Ch 24 (Wrap it around the body, make more or less chains as needed), join to the first ch to make a circle
R1.    Sc around, join with sl st.
R2-3    ch 3, dc around, join with sl st
R4    dividing the pants into two parts), ch 3 (skip 12 sts),  sc in each of next 12 sts ,join with sl st
R5    sc around
Rep R4-5 on the other half of the pants. Before you start a starting chain leave a long tail for sewing the gap.
Continue working on the upper part.
Start making sc in 8th st of chain base, sc in each of next 9 st (10)
Ch 1, turn, sc in each sts (10)Continue making a strap, ch 20 (wrap it around the neck, make more or less as needed), skip  5 sts for button hole and continue working from 6th st from hook, sc in each sts till the end, + sl st
F/O, sew the button


Shoes (Using pink and blue, make two of each color)
R1    ch 4, sc in the second chain from hook, sc in next st, 3 sc in a st corner,  sc in next st, inc in last st  (8)
R2    Inc, sc, [inc=3x],  sc, [inc=2x]  (14)
R3    BLO, sc around
R4    4 sc, [dec=3x], 4 sc (11)
F/O

Ribbon Head band:
Headband:
Using pink
R1: Ch 40 (measure it to your bunny head, add or less the chain if needed), join with sl st
R2: sc in each sts + sl st
F/O

Ribbon:
Using pink
Ch 10:
R1: starting from second chain from hook, sc in each sts,
R2-8: ch 1, turn, sc in each sts
F/O leaving a long tail for sewing. Sew the tail to the centre of ribbon, wrap around several times. F/O
Sew the ribbon to headband.


Finishing
Sew the head to the body
Sew arms and legs to the body

 Flatten the ears and sew on the second row of the head

Embroider the nose using pink yarn in the center of head (in R10), sew across on 2 sts
Embroider the eyes by using black yarn from R8 to R9( the space from nose is about 2 sts  on left and 2 sts on right, and 6 sts between both eyes)
Embroider the eyes one stitch away from the left and right of the nose, with 2 stitches in height.

Dress the bunnies

Your macaroon bunnies are ready!

This pattern is an original by Melani. Please do not claim this pattern as your own. If you wish to share this pattern, you may link this pattern but please do not reprint it to your site or share it in a pdf or picture format.
You may keep a copy of this pattern for personal use but you may not sell the pattern. You can sell the items that you made from this pattern as you credit Melani as the designer.
Please leave comment if you have a question or find any mistake in this pattern. I will do the corrections as soon as possible. I will be happy to see your creation from this pattern so please share your handmade to my Facebook Page Zan Amigurumi or Instagram @zancrochet
Thanks...

Easter Bunny

This cute bunny can be a good choice for your Easter decoration or gift. The pattern is so simple and easy, very suitable for beginner. I almost could not stop my self in making them :D
Don't forget share your creation to my Facebook page Zan Amigurumi or Instagram @zancrochet

Materials needed:
Yarn in any color (main color and contrasting color, multi color yarn for making eggs)
2 mm crochet hook
Polyester fiberfill
Stitch marker for working in the round
Needle for sewing
8 mm safety eyes
Scissor

Abbreviations:
sc = single crochet
inc = increase
dec = decrease
st = stitch
ch = chain
skp = skip
R = round
CC = change color
BLO = back loops only
FO = fasten off

Note: This project is working in continuous rounds.

Head and Body:
Using white
R1: ch 2, starting from second chain from hook 6 sc
R2: inc, rep 6x (12)
R3: sc, inc, rep 6x (18)
R4: 2 sc, inc, rep 6x (24)
R5: 3 sc, inc, rep 6x (30)
R6: sc around
R7: 4 sc, inc, rep 6x (36)
R8: sc around
R9: 5 sc, inc, rep 6x (42)
R10: sc around
R11: 6 sc, inc, rep 6x (48)
R12-16: sc around
R17: 3 sc, inc, rep 12x (60)
R18-19: sc around
R20: 9 sc, inc, rep 6x (66)
R21-27: sc around
If you are using safety eyes, attach them in between R9 – R10, leaving 8 sts between them.
R28: 9 sc, dec, rep 6x (60)
R29: 8 sc, dec, rep 6x (54)
R30: BLO, 7 sc, dec, rep 6x (48)
R31: 6 sc, dec, rep 6x (42)
R32: 5 sc, dec,rep 6x (36)
R33: 4 sc, dec, rep 6x (30)
R34: 3 sc, dec, rep 6x (24)
stuff
R35: 2 sc, dec, rep 6x (18)
R36:, sc, dec, rep 6x (12)
Add more stuff
R37: dec, rep 6x (6)
F/O

Ears (make 2):
Use main color
R1: ch 2, starting from second chain from hook 6 sc
R2: sc around
R3: sc, inc, rep 3x (9)
R4: sc around
R5: 2 sc, inc, rep 3x (12)
R6: sc around
R7: 3 sc, inc, rep 3x (15)
R8: sc around
R9: 4 sc, inc, rep 3x (18)
R10-19: sc around
R20: sc, dec, rep 6x (12)
R21: 2 sc, dec, rep 3x (9)
F/O leaving a long tail for sewing

Inner Ears (make 2):
Use contrasting color:
R1: ch 2, starting from second chain from hook 2 sc
R2 : ch 1, turn, sc in each sts
R3: ch 1, turn, inc in each sts (4)
R4-8: ch 1, turn, sc in each sts
R9: ch 1, turn, dec = 2x (2)
R10: ch 1, turn, dec
F/O leaving a long tail for sewing

Hands (make 2):
Use main color
R1: ch 2, starting from second chain from hook 5 sc
R2: inc, rep 5x (10)
R3: sc, inc, rep 5x (15)
R4-5: sc around
R6: sc, dec, rep 5x (10)
Stuff
R7-16: sc around
Add more a little stuff.
F/O leaving a long tail for sewing.  Close the hole by sewing both side of hand. Don’t cut the yarn. We will use it for sewing  hand to body.

Legs (make 2):
Use main color
R1: ch 2, starting from second chain from hook 6 sc
R2: inc, rep 6x (12)
R3: sc, inc, rep 6x (18)
R4: sc, inc, [2 sc, inc = rep 5x], sc (24)
R5: work in BLO, sc around
R6: sc around
R7: 8 sc, 4 dec, 8 sc (20)
R8: 6 sc, 4 dec, 6 sc (16)
R9-10:  sc around
Stuff
F/O leaving a long tail for sewing

Tail:
Use main color
R1: ch 2, starting from second chain from hook 6 sc
R2: inc, rep 6x (12)
R3: sc, inc, rep 6x (18)
R4-5: sc around
Stuff
F/O leaving a long tail for sewing

Easter eggs (make several):
I used multi color yarn
R1: ch 2, starting from second chain from hook 6 sc
R2: inc, rep 6x (12)
R3: sc, inc, rep 6x (18)
R4: sc around
R5: 2 sc, inc, rep 6x (24)
R6-7: sc around
R8: 2 sc, dec, rep 6x (18)
R9: sc around
Stuff
R10: sc, dec, rep 6x (12)
R11: dec, rep 6x (6)
F/O

Finishing:
Sew nose, mouth and eyebrows to make face.
Sew inner ears on the ears.
Sew the ears on the head.
Sew the hands on the sides of its body.
Sew the legs in front part of body.
Sew the tail on the back side part of body.
This pattern is an original by me, Zan Merry. Please do not claim this pattern as your own. If
you wish to share this pattern, you may link this pattern but please do not reprint it to your site.
You may keep a copy of this pattern for personal use but you may not sell this pattern. You can
sell the items that you made from this pattern as you credit me as the designer.
Please leave comment if you have a question or find any mistake in my pattern. I will do the corrections as soon as posibble.
Don't forget to like my Facebook page Zan Amigurumi and Instagram @zancrochet
Thanks...

Mimi Rabbit

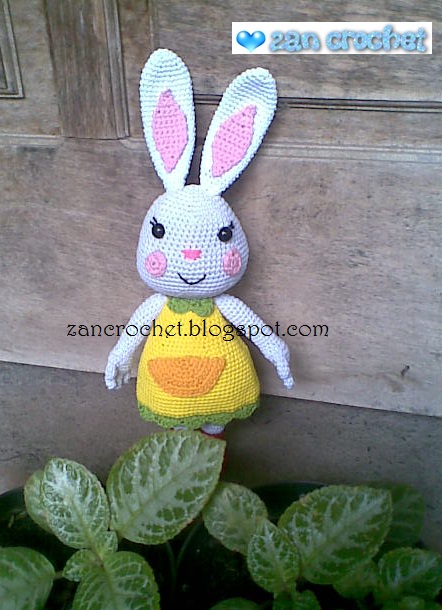
Free amigurumi pattern - Mimi Rabbit or in Indonesia called Mimi Kelinci is one of character from Mimi Rabbit Series (seri Mimi kelinci) that educate children about many good things.
This doll is about 22 cm (not include the ears), but the size is depend on the yarn and hook you used.

Please join my Page on Facebook Zan Amigurumi and follow my Instagram @zancrochet

For Dutch version please click here
For Turkish version please click here
 
Materials needed:
Yarn in white, yellow, red, pink, light green and light orange
2 mm crochet hook
Polyester fiberfill
Stitch marker for working in the round
Needle for sewing
8 mm safety eyes
Scissor
Glue

Abbreviations:
sc = single crochet
inc = increase
dec = decrease
sl st = slip stitch
st = stitch
ch = chain
skp = skip
R = round
CC = change color
BLO = back loops only
FO = fasten off

Note: This project is working in continuous rounds, do not join or turn unless otherwise
stated. Mark first stitch of each round.

Head:
Using white
R1: ch 2, starting from second chain from hook 6 sc
R2: inc, rep 6x (12)
R3: sc, inc, rep 6x (18)
R4: 2 sc, inc, rep 6x (24)
R5: 3 sc, inc, rep 6x (30)
R6: 4 sc, inc, rep 6x (36)
R7: 5 sc, inc, rep 6x (42)
R8: 6 sc, inc, rep 6x (48)
R9-14: sc around
R15: 3 sc, inc, rep 12x (60)
R16: 9 sc, inc, rep 6x (66)
If you are using safety eyes, attach them in R11 - R12, leaving 10 st between them.
R17-22: sc around
R23: 9 sc, dec, rep 6x (60)
R24: 8 sc, dec, rep 6x (54)
R25: 7 sc, dec, rep 6x (48)
R26: 6 sc, dec, rep 6x (42)
R27: 5 sc, dec,rep 6x (36)
R28: 4 sc, dec, rep 6x (30)
stuff
R29: 3 sc, dec, rep 6x (24)
F/O

Blushes (make 2):
Using pink
R1: ch 2, starting from second chain from hook 6 sc
R2: inc, rep 6x (12)
F/O

Ears (make 2):
Using white
R1: ch 2, starting from second chain from hook 5 sc
R2: inc, rep 5x (10)
R3: sc, inc, rep 5x (15)
R4: sc around
R5: 2 sc, inc, rep 5x (20)
R6: sc around
R7: 9 sc, inc, rep 2x (22)
R8-19: sc around
R20: 9 sc, dec, rep 2x (20)
R21: sc around
R22: 8 sc, dec, rep 2x (18)
R23: sc around
R24: 7 sc, dec, rep 2x (16)
R25: sc around
R26: 6 sc, dec, rep 2x (14)
R27: 5 sc, dec, rep 2x (12)
R28: 4 sc, dec, rep 2x (10)
F/O leave a long tail for sewing

Inner Ears (make 2):
Using pink
R1: ch 2, starting from second chain from hook 2 sc
R2 : ch 1, turn, sc in each st
R3: ch 1, turn, inc in each st (4)
R4: ch 1, turn, sc in each st
R5: ch 1, turn, inc, 2 sc, inc (6)
R6-10: ch 1, turn, sc in each st
R11: ch 1, turn, dec, 2 sc, dec (4)
R12: ch 1, turn, sc in each st
R13: ch 1, turn, 2 dec (2)
R14: ch 1, turn, sc in each st
R15: ch 1, turn, dec (1)
F/O Leave a long tail for sewing


Legs and Body:
Legs (make 2):
Using red
ch 6
R1: starting from 2nd chain from hook, 4 sc, 3 sc in last st, continue your work st around the other side of chain, 3 sc, 2 sc in last st. (12)
R2: inc, 3 sc, 3 inc, 3 sc, 2 inc (18)
R3: sc, inc, 4 sc, inc, sc, inc, sc, inc, 4 sc, inc, sc, inc (24)
R4: 3 sc, inc, rep 6x (30)
R5: BLO sc around
R6: sc aorund
R7: 9 sc, 6 dec, 9 sc (24)
R8: 6 sc, 6 dec, 6 sc (18)
R9: 6 sc, 3 dec, 6 sc (15)
stuff
R10-13: sc around
CC to white
R14: BLO, sc around
R15-23: sc around
stuff
F/O but don't cut the yarn for 2nd legs

Body:
Using white
In this part we will crochet both legs together.
Take 2 nd leg, ch 1, this chain will be counted as 2 stitch (back and front)
R24: join 1 st leg, sc around 1st leg (make sure that you put both legs in same possition. I started sc in 5th st of 1st leg), sc in ch st (back side), sc around in 2nd leg, sc in ch st (front side) (32 st in total)
R25: sc around (32)
R26: 3 sc , inc, rep 8 x (40)
R27: 4 sc, inc, rep 8x (48)
R28-34: sc around
R35: 6 sc, dec, rep 6x (42)
R36-39: sc around
R40: 5 sc, dec, rep 6x (36)
R41-43: sc around
R44: 4 sc, dec, rep 6x (30)
R45-48: sc around
R49: 3 sc, dec, rep 6x (24)
R50: sc around
stuff
F/O leave a long tail for sewing
Using red yarn, continue working in front loop of R13,  sl st around F/O

Hands and arms (make2):
Using white
Thumb:
R1: ch 2, starting from second chain from hook 5 sc
R2-3: sc around
F/O leave long tail for sewing the gap

Fingers (make 3):
R1: ch 2, starting from second chain from hook 5 sc
R2-4: sc around
F/O leave tail for sewing the gap
For the 3rd finger don't cut the yarn

Hand:
The fingers now will be crocheted together.
R1: sc in next 2 st of 3rd finger, take 1st finger and sc in next 3 st, take 2nd finger and sc in all st, sc in next 2 st of 1st finger (middle finger), sc in the last 3 st of 3rd finger (15)
R2: sc around
R3: in this part the thumb will be crocheted together, 8sc, (take the thumb) sc in 5 st of thumb, sc in last 7st (20)
R4: sc around
R5: 8 sc, dec, rep 2x (18)
R6: sc, dec, rep 6x (12)
stuff
R7-22: sc around
stuff
F/O leave a long tail.

Dress:
Using yellow
R1: 36 Sc in magic ring (36) (don’t close the ring completely)
R2: sc around
R3: 5 sc, inc, rep 6x (42)
R4-6: sc around
R7: 6 sc, inc, rep 6x (48)
R8: 7 sc, inc, rep 6x (54)
R9-10: sc around
R11: 8 sc, inc, rep 6x (60)
R12: 9 sc, inc, rep 6x (66)
R13-15: sc around
R16: 10 sc, inc, rep 6x (72)
R17-27: sc around
CC to light green
R28: sc around, sl st to first st
R29: skp 2, 5 dc, skp2, sl st, rep around (12 fan stitch in total)

Dress Collar: 
Using light green
Ch13
R1: sc in second ch from hook, sc in next 11 st (12)
R2: ch 1, turn, skp 2, 5 dc in one st, skp 2, sl st, skp 2, 5 dc, sl st
F/O Leave a long tail for sewing
Dress Pocket:
Using light orange
R1: ch 2, starting from second chain from hook 3 sc
R2: ch 1, turn, inc in each (6)
R3: ch 1, turn, sc, inc, rep 3x (9)
R4: ch 1, turn, 2 sc, inc, rep 3x (12)
R5: ch 1, turn, 3 sc, inc, rep 3x (15)
R6: ch 1, turn, 4 sc, inc, rep 3x (18)
R7: ch 1, turn, 5 sc, inc, rep 3 x (21)
R8: ch 1, turn, 6 sc, inc, rep 3x (24)
F/O leave long tail for sewing

 
Finishing:
 

  • If you do not use safety eyes you can used small black felt then glue them on head.
  • Sew nose by using pink yarn
  • Sew eyebrow and mouth by using black yarn
  • Sew or glue blushes on her face
  • Put the dress over the body and sew the body to the head.
  • Tighten the Magic ring of the dress and give a little sewing to the body.  
  • Sew the pocket to dress
  • Sew  dress collar to its dress
  • Sew arms, I suggest sew the arms on the dress only.
  • Sew the inner ears to each ears.
  • Sew both ears on the head.
This pattern is made by me, Zan Merry. Don’t reprint it to your site or blog. You can sale the ami that you’ve made from this pattern but not the pattern. Sometime I make a mistake in writing my pattern, if you find any mistake, please leave a comment so I can edit it.
Enjoy this free amigurumi pattern. Happy crochet!!!

Last Edited : March 4, 2017

Amigurumi Bunny "Si Kelinci" small version

Kelinci ini aku buat sebagai versi kecil dari pola Amigurumi Bunny "Si Kelinci" bagian kepala dan telinganya aku ambil dari pola Baby Bunny dan ternyata hasilnya lucu juga.Semoga kalian suka ya dengan pola ini. Selamat Merajut.....!!!!

Amigurumi Bunny "Si Kelinci" small version

Abbreviations:
sc: single crochet
dc: double crochet
ch: chain
st: Stitch
Inc : increase
dec: decrease
sl st : slip stitch
F/O: Fasten off
CC: change color 

Materials:
2 mm crochet hook
dark and light blue, yellow, purple yarn
Needle for sewing
Stuff
doll eyes 

Note: work in continuous round

Head:
Light blue yarn
R1: ch 2, starting from second chain from hook 6 sc
R2: inc, rep 6x (12)
R3: sc, inc, rep 6x (18)
R4: 2sc, inc, rep 6x (24)
R5: 3sc, inc, rep 6x (30)
R6-8: sc around (30)
R9: 3sc, dec, rep 6x (24)
R10: 2sc, dec, rep 6x (18)
Stuff the head
R11: sc, dec, rep 6x (12)
F/O 

Ear (Make 2):
Dark blue yarn
R1: ch 2, starting from second chain from hook 4 sc
R2: inc, rep 4x (8)
R3: sc, inc, rep 4x (12)
R4: 2sc, inc, rep 4x (16)
R5: 3sc, inc, rep 4x(20)
R6: 3sc, dec, rep 4x (16)
R7: 2sc, dec, rep 4x (12)
R8: 4sc, dec, rep 2x (10)
R9-10: sc around (10)
R11: 3sc, dec, rep 2x (8)
F/O  Leaving long tail for sewing

Hands (make 2):
Light blue yarn
R1: ch 2, starting from second chain from hook 6 sc
R2-4: sc around
CC to yellow
R5-7: sc around
stuff
F/O Leaving long tail for sewing

Legs (make 2) and Body:
1st leg:
Purple yarn
R1: ch 2, starting from second chain from hook 4 sc
R2: inc around (8)
R3-4: sc around
CC to light blue
R5-7: sc around
stuff
F/O leaving long tail

2nd leg:
Work as given for First Leg. Do not fasten off. Then continue for Body:
(Kerjakan sama seperti kaki 1, jangan matikan benang. Kemudian lanjutkan membuat Badan)
R8: join the second leg to the first leg with sl st to the 1st st of the first leg, the sl st will count as 2 stitches (back and front), sc around, now we have  18 sc around
(R8: satukan kaki kedua dan kaki pertama dengan sl st pada st pertama di kaki pertama, sl st ini akan kita hitung sebagai 2 buah stitch (bagian belakang dan depan), sc sekeliling, dan sekarang kita punya 18 sc)
Pull out the yarn from the first leg for sewing through the gap between the legs after body is done and stuffed.
(Keluarkan sisa benang dari kaki pertama, benang ini kan kita gunakan untuk menjahit apabila ada lubang kecil antara kedua kaki setelah badan selesai dan di isi dengan dakron)
R9: 8sc, inc, rep 2x (20)
R10-14: sc around
R15: 8sc, dec, rep 2x (18)
R14: 7sc, dec, rep 2x (16)
R15: 6sc, dec, rep 2x (14)
stuff
R16: 5sc, dec, rep 2x (12)
F/O leaving long tail for sewing

Dress:
Yellow yarn
R1: 22 dc in magic ring (22) (don’t close the ring completely)
R2: dc around
R3: dc, inc, rep 11x (33)
CC to purple
R4: dc around
R5: *ch1, sl st, rep around
F/O

Finishing:
Sew the ears to the head.
(jahit telinga ke kepala)
Sew the head to the body.
(jahit kepala ke badan)
Put the dress over the body then sew it.
(letakan baju ke badan kemudian jahit)
Sew the arms on the dress only.
(jahit tangan, jahit ke bagian baju saja)
Attach eyes.
(tambahkan mata)
Sew its nose using pink yarn.
(jahit hidung nya dengan benang warna merah muda)


“SELESAI”
Now you have your own “kelinci”..
This pattern is made by me, Zan Merry. Don’t reprint it to your site or blog. You can sale the doll that you’ve made from this pattern but not the pattern. If you find some mistakes in this pattern, please tell me.Thanks. 

Selesai
Pola ini dibuat oleh saya, Zan Merry. Harap jangan di tulis ulang ke blog atau website lain. Kamu bisa menjual kelinci yang kamu buat dari pola ini tapi jangan jual pola nya. Jika saya membuat kesalahan dalam pola ini harap beritahu saya. Terima Kasih.

Baby Bunny

I’m pleased to finally present to you my baby bunny pattern. This pattern is so easy to follow. I hope you like her!
Don't forget to share your creation from my pattern on my Facebook page Zan Amigurumi


Abbreviations: 
Sc: Single crochet    
ch: chain
St: Stitch
Inc : increase
Dec: decrease
Sl st : slip stitch
F/O: Fasten off

Materials:
2 mm crochet hook
Pink and white yarn
Needle for sewing
Stuff

Note: work in continuous round

Head:
Pink yarn
R1: ch 2, starting from second chain from hook 6 sc
R2: inc, rep 6x (12)
R3: sc, inc, rep 6x (18)
R4: 2sc, inc, rep 6x (24)
R5: 3sc, inc, rep 6x (30)
R6-8: sc around (30)
R9: 3sc, dec, rep 6x (24)
R10: 2sc, dec, rep 6x (18)
Stuff the head
R11: sc, dec, rep 6x (12)
F/O

Ear (Make 2):
Pink yarn
R1: ch 2, starting from second chain from hook 4 sc
R2: inc, rep 4x (8)
R3: sc, inc, rep 4x (12)
R4: 2sc, inc, rep 4x (16)
R5: 3sc, inc, rep 4x(20)
R6: 3sc, dec, rep 4x (16)
R7: 2sc, dec, rep 4x (12)
R8: 4sc, dec, rep 2x (10)
R9-10: sc around (10)
R11: 3sc, dec, rep 2x (8)
F/O  Leaving long tail for sewing

Body:
Pink yarn
R1: ch 2, starting from second chain from hook 5 sc
R2: inc, rep 5x (10)
R3: sc, inc, rep 5x (15)
R4: 2sc, inc, rep 5x (20)
R5: 3sc, inc, rep 5x (25)
R6-7: sc around (25)
R8: 3sc, dec, rep 5x (20)
R9: sc around (20)
R10: 8sc, dec, rep 2x (18)
R11: 7sc, dec, rep 2x (16)
R12: 6sc, dec. rep 2x (14)
Stuff
R13: 5sc, dec, rep 2x (12)
F/O leaving long tail for sewing.

Leg (make 2):
Pink yarn
R1: ch 2, starting from second chain from hook 6 sc
R2: inc, rep 6x (12)
R3-4: sc around (12)
R5: sc, dec , rep 4x (8)
Stuff.
F/O leave long tail for sewing.

Hand (make 2):
Pink yarn
R1: ch 2, starting from second chain from hook 6 sc
R2: inc, rep 6x (12)
R3: sc around (12)
R4: 4sc, dec, rep 2x (10)
R5: 3sc, dec, rep 2x (8)
R6: sc around (8)
Stuff
R7: 2sc, dec, rep 2x (6)   
F/O leave long tail.

Tail:
Pink yarn
R1: ch 2, starting from second chain from hook 4 sc
R2: inc, rep 4x (8)
R3: sc around
Stuff
F/O leave long tail.

Assembly:
Sew the body to the head.
Sew the ears to the head
Sew the arms and the legs to the body.
Sew the tail to the back of the body.
Sew the eyes and mouth of the rabbit.

Dress:
white yarn
R1: In magic ring, 3ch (count as first dc), 24dc, do not fasten the magic ring, sl st (25)
R2: 3ch, dc around (25)
R3: 3ch, sl to the next stitch repeat around
F/O continue working in the magic ring for first row of the dress
R4: Sc between 11th and 12th dc of the first row, 4 sc in th next 4 dc (5)
R5: 1ch, turn, 5sc (5)
R6: 1ch, turn 5 sc (5)
Put on the dress to bunny, fasten off the magic ring,  6 ch then sl st to the first dc of R1  (back side of the dress), 6 ch then sl st to next side of the front dress.


“SELESAI”

Now you have your own baby bunny..
This pattern is designed by me, Zan Merry. Don’t reprint it to your site or blog. You can sale the ami that you’ve made from this pattern but not the pattern. Thanks.


Amigurumi Bunny “Si Kelinci”


For Dutch version please click here 
For French version please click here

Abbreviations:
sc: single crochet
ch: chain
st: stitch
inc : increase
dec: decrease
sl st : slip stitch
F/O: fasten off

Materials:
Cotton yarn in various color ( I use cream, maroon and pink in this pattern)
2mm crochet hook
Needle for sewing
Stuff

Note: work in continuous round


Head:
With cream
R1: ch 2, starting from second chain from hook 6 sc
R2: inc, rep 6x (12)
R3: sc, inc, rep 6x (18)
R4: 2sc, inc, rep 6x (24)
R5: 3sc, inc, rep 6x (30)
R6: 4sc, inc, rep 6x (36)
R7-12: sc around
If you are using safety eyes, place them between row 7 and 8 leaving 6 st between them.
R13: 4sc, dec, rep 6x (30)
R14: 3sc, dec, rep 6x (24)
R15: 2sc, dec, rep 6x (18)
Stuff the head
R16: sc, dec, rep 6x (12)
F/O

Ears (make 2):
With cream
R1: ch 2, starting from second chain from hook 6 sc
R2: inc, rep 6x (12)
R3: sc, inc, rep 6x (18)
R4-9: sc around
R10: sc, dec, rep 6x (12)
R11-13: sc around
F/O leave long tail.


Legs (make 2) and Body:
1st leg:
With pink
R1: 2ch, starting from the second ch from the hook, 6sc
R2: inc, rep 6x (12)
R3: sc, inc, rep 6x (18)
R4: 6 dec, 6sc (12)
R5: 3 dec, 6sc (9)
Stuff the bottom of the leg. Change color to cream.
R6-15: sc around
Stuff
F/O leave long tail


2nd leg:
Work as given for First Leg. Do not fasten off. Cont as follows for Body:
R16: join the second leg to the first leg with sl st to the 5th st of the first leg, sc around, now we have 18 sc around
Pull out the yarn from the first leg for sewing through the gap between the legs after body is done and stuffed.
R17: 2sc, inc rep 6x (24)
R18-26: sc around
R27: 2sc, dec, rep 6x (18)
R28-29: sc around
Stuff the body.
R30: sc, dec, rep 6x (12)
R31: sc around
F/O leave long tail.
Sew the gap nicely.

Arms (make2):
With cream
R1: 2ch, starting from the second ch from the hook,  6sc
R2: sc, inc, rep 3x (9)
R3-10: sc around
Change color to maroon
R11-13: sc around
Stuff
R14: sc, dec rep 3x (6)
F/O leave long tail for sewing arms to the body

Dress:
With maroon
R1: 18 Sc in magic ring (18) (don’t close the ring completely)
R2: 2sc, inc, rep 6x (24)
R3-4: sc around
R5: 3sc, inc, rep 6x (30)
R6-7: sc around
R8: 4sc, inc, rep 6x (36)
R9-13: sc around
R14: 5sc, inc, rep 6x (42)
R15-17: sc around
Change color to pink
R18: sc around
R19: *2ch, 2hdc in the same stitch, skip 1, sl st in the next st *,  rep * around
F/O
Assembly:
Sew the ears to the head.
Put the dress over the body and sew the body on the head.
Sew the arms, I suggest sew the arms on the dress only.
Sew the mouth of the rabbit.
If you don’t have safety eyes you can sew it

“SELESAI”
Now you have your own “kelinci”..
This pattern is made by me, Zan Merry. Don’t reprint it to your site or blog. You can sale the ami that you’ve made from this pattern but not the pattern. If you find some mistakes in this pattern, please tell me.Thanks.
 
Semoga suka dengan hasil nya....
Mari di coba yuk....
Kalau ada salah-salah kata maaf yah... soal nya bahasa inggris nya pas-pasan.... jadi bingung sendiri merangkai katanya... wkwkwkwkwk
sealkazzsoftware.blogspot.com resepkuekeringku.com