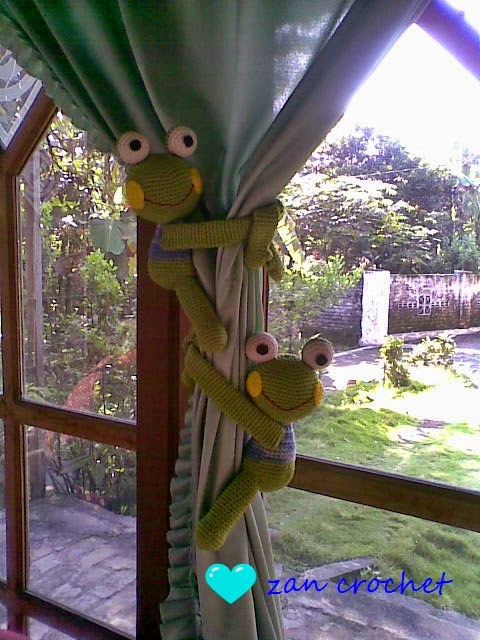
Another pattern for curtain tie back...
Please like my page on Facebook Zan Amigurumi and share your creation there...
Happy crochet!!
 Abbreviations:
sc: single crochet
ch: chain
st: stitch
inc : increase
dec: decrease
hdc: half double crochet
F/O: Fasten off
Materials:
2 mm crochet hook
Crochet yarn in yellow, orange and black
Black, light blue and white felt for eyes
Needle for sewing
Stuff
Glue
Scissors
Note: This project is working in continuous rounds
Head:
Using yellow
R1: ch 2, starting from second chain from hook 4 sc
R2: inc around (8)
R3: inc around (16)
R4: sc, inc, rep 8x (24)
R5: 2sc, inc, rep 8x (32)
R6: 3sc, inc, rep 8x (40)
R7: 4sc, inc, rep 8x (48)
R8: sc around
R9: 7sc, inc, rep 6x (54)
R10-14: sc around
R15: 7sc, dec, rep 6x (48)
R16: sc around
R17: 14 sc, dec, rep 3x (45)
R18: sc around
R19: 13sc, dec, rep 3x (42)
R20: sc around
R21: 12sc, dec, rep 3x (39)
R22: sc around
R23: 11sc, dec, rep 3x (36)
R24: 10sc, dec, rep 3x (33)
R25: sc around
R26: 9sc, dec, rep 3x (30)
R27: sc around
R28: 8sc, dec, rep 3x (27)
R29: sc around
R30: 7sc, dec, rep 3x (24)
stuff
F/O
Body:
Using Yellow
 R1: ch 2, starting from second chain from hook 6 sc
R2: inc, rep 6x (12)
R3: sc, inc, rep 6x (18)
R4: 2sc, inc, rep 6x (24)
R5: 3sc, inc, rep 6x (30)
R6: 4sc, inc, rep 6x (36)
R7-11: sc around
R12: 8sc, dec, 16sc, dec, 8sc (34)
R13: 15sc, dec, rep 2x (32)
R14: 7sc, dec, 14sc, dec, 7sc (30)
R15: 13sc, dec, rep 2x (28)
R16: 6sc,dec, 12sc, dec, 6sc (26)
R17-18: sc around
R19: 11sc, dec, rep 2x (24)
R20-23: sc around
stuff
F/O Leaving a long tail for sewing
Hands (make 2):
Using yellow
R1: ch 2, starting from second chain from hook 6sc
R2: inc around (12)
R3-54: sc around
F/O leaving a long tail for sewing
Legs (make 2):
Using orange
R1: ch 2, starting from second chain from hook 5sc
 R2: inc around (10)
R3: sc, inc, rep 5x (15)
R4: 2sc, inc, rep 5x (20)
R5: 9sc, inc, rep 2x (22)
R6-10: sc around
R11: 9sc, dec, rep 2x (20)
R12: 8sc, dec, rep 2x (18)
R13: 7sc, dec, rep 2x (16)
R14: 6sc, dec, rep 2x (14)
R15: 5sc, dec, rep 2x (12)
R16: 6 hdc (skip next 6 st, we will work there in R18), ch 1, turn
R17: 6 hdc, ch 1, turn
R18: 6 hdc, 6 sc in next stitches (12)
stuff
R19-20: sc around
R21: 4sc, dec, rep 2x (10)
R22-27: sc around
stuff
F/O leaving a long tail for sewing
Cheeks (make 2):
Using yellow
R1: ch 2, starting from second chain from hook 5sc
R2: inc around (10)
R3: sc, inc, rep 5x (15)
R4: 2 sc, inc, rep 5x (20)
R5: sc around
stuff
F/O leaving a long tail for sewing
Beak:
Using orange
R1: ch 2, starting from second chain from hook 6sc
R2: sc, inc, rep 3x (9)
R3: 2sc, inc, rep 3x (12)
R4: 3sc, inc, rep 3x (15)
R5: sc around
stuff
F/O leaving a long tail for sewing
Tail:
Using yellow
R1: ch 2, starting from second chain from hook 6sc
R2: inc around (12)
R3-4: sc around
R5: 5sc, inc, rep 2x (14)
F/O leaving a long tail for sewing
 Hair:
Hair:
using black
R1: ch 6, sl st to the second chain from hook, sl st to next 4 ch (don't fasten off) (5)
R2: ch 10, sl st to the second chain from the hook, sl st to next 8 ch (9)
R3: ch 6, sl st to the second chain from hook, sl st to next 4 ch (5), sl st to 1st ch of R1
F/O leaving long tail
Finishing:
 Sew the body to the head.
Sew the cheek to the head
Sew the beak between the cheek
Cut the felt in oval shape with different size. Glue the eyes to the head.
 Sew the hair on the head
Sew the eyebrow using black yarn to the head
Sew the arms to body and legs at the bottom of body (put arms and leg as if Tweety's face turn to right or left)
Sew the tail to the back of the body.
 This pattern is an original by me, Zan Merry. Please do not claim this pattern as your own. If you wish to share this pattern, you may link this pattern but please do not reprint it to your site.You may keep a copy of this pattern for personal use but you may not sell this pattern. You can sell the items that you made from this pattern as you credit me as the designer.
Please leave comment if you have a question or you can email me to cintaku.zanee@gmail.com
If you find some mistake in my pattern, please tell me... I will do the corrections. I will be happy
to see your creation from this pattern so please share your handmade to me...
Please like my page on Facebook Zan Amigurumi
Thanks...
Please like my page on Facebook Zan Amigurumi and share your creation there...
Happy crochet!!

sc: single crochet
ch: chain
st: stitch
inc : increase
dec: decrease
hdc: half double crochet
F/O: Fasten off
Materials:
2 mm crochet hook
Crochet yarn in yellow, orange and black
Black, light blue and white felt for eyes
Needle for sewing
Stuff
Glue
Scissors
Note: This project is working in continuous rounds
Head:
Using yellow
R1: ch 2, starting from second chain from hook 4 sc
R2: inc around (8)
R3: inc around (16)
R4: sc, inc, rep 8x (24)
R5: 2sc, inc, rep 8x (32)
R6: 3sc, inc, rep 8x (40)
R7: 4sc, inc, rep 8x (48)
R8: sc around
R9: 7sc, inc, rep 6x (54)
R10-14: sc around
R15: 7sc, dec, rep 6x (48)
R16: sc around
R17: 14 sc, dec, rep 3x (45)
R18: sc around
R19: 13sc, dec, rep 3x (42)
R20: sc around
R21: 12sc, dec, rep 3x (39)
R22: sc around
R23: 11sc, dec, rep 3x (36)
R24: 10sc, dec, rep 3x (33)
R25: sc around
R26: 9sc, dec, rep 3x (30)
R27: sc around
R28: 8sc, dec, rep 3x (27)
R29: sc around
R30: 7sc, dec, rep 3x (24)
stuff
F/O
Body:
Using Yellow
 R1: ch 2, starting from second chain from hook 6 sc
R2: inc, rep 6x (12)
R3: sc, inc, rep 6x (18)
R4: 2sc, inc, rep 6x (24)
R5: 3sc, inc, rep 6x (30)
R6: 4sc, inc, rep 6x (36)
R7-11: sc around
R12: 8sc, dec, 16sc, dec, 8sc (34)
R13: 15sc, dec, rep 2x (32)
R14: 7sc, dec, 14sc, dec, 7sc (30)
R15: 13sc, dec, rep 2x (28)
R16: 6sc,dec, 12sc, dec, 6sc (26)
R17-18: sc around
R19: 11sc, dec, rep 2x (24)
R20-23: sc around
stuff
F/O Leaving a long tail for sewing
Hands (make 2):
Using yellow
R1: ch 2, starting from second chain from hook 6sc
R2: inc around (12)
R3-54: sc around
F/O leaving a long tail for sewing
Legs (make 2):
Using orange
R1: ch 2, starting from second chain from hook 5sc

R3: sc, inc, rep 5x (15)
R4: 2sc, inc, rep 5x (20)
R5: 9sc, inc, rep 2x (22)
R6-10: sc around
R11: 9sc, dec, rep 2x (20)
R12: 8sc, dec, rep 2x (18)
R13: 7sc, dec, rep 2x (16)
R14: 6sc, dec, rep 2x (14)
R15: 5sc, dec, rep 2x (12)
R16: 6 hdc (skip next 6 st, we will work there in R18), ch 1, turn
R17: 6 hdc, ch 1, turn
R18: 6 hdc, 6 sc in next stitches (12)
stuff
R19-20: sc around
R21: 4sc, dec, rep 2x (10)
R22-27: sc around
stuff
F/O leaving a long tail for sewing
Cheeks (make 2):
Using yellow
R1: ch 2, starting from second chain from hook 5sc
R2: inc around (10)
R3: sc, inc, rep 5x (15)
R4: 2 sc, inc, rep 5x (20)
R5: sc around
stuff
F/O leaving a long tail for sewing
Beak:
Using orange
R1: ch 2, starting from second chain from hook 6sc
R2: sc, inc, rep 3x (9)
R3: 2sc, inc, rep 3x (12)
R4: 3sc, inc, rep 3x (15)
R5: sc around
stuff
F/O leaving a long tail for sewing
Tail:
Using yellow
R1: ch 2, starting from second chain from hook 6sc
R2: inc around (12)
R3-4: sc around
R5: 5sc, inc, rep 2x (14)
F/O leaving a long tail for sewing

using black
R1: ch 6, sl st to the second chain from hook, sl st to next 4 ch (don't fasten off) (5)
R2: ch 10, sl st to the second chain from the hook, sl st to next 8 ch (9)
R3: ch 6, sl st to the second chain from hook, sl st to next 4 ch (5), sl st to 1st ch of R1
F/O leaving long tail
Finishing:

Sew the cheek to the head
Sew the beak between the cheek
Cut the felt in oval shape with different size. Glue the eyes to the head.
Sew the eyebrow using black yarn to the head
Sew the arms to body and legs at the bottom of body (put arms and leg as if Tweety's face turn to right or left)
Sew the tail to the back of the body.

Please leave comment if you have a question or you can email me to cintaku.zanee@gmail.com
If you find some mistake in my pattern, please tell me... I will do the corrections. I will be happy
to see your creation from this pattern so please share your handmade to me...
Please like my page on Facebook Zan Amigurumi
Thanks...