Showing posts with label Frog. Show all posts

Amigurumi Frog

 Amigurumi Frog

Notes:
This pattern uses US terminology.
This amigurumi is worked in continuous rounds.
Gauge is not important in this project.
Use MR (magic ring) as an alternative of ch 2.
Measurement:  approximately 10 cm tall.
Skill Level: beginner


 Abbreviations:
sc: single crochet  
ch: chain
st: Stitch
inc : increase
dec: decrease ( 2sctog)
Sl st : slip stitch
R: round/row
Rep: repeat

Materials:
5 ply milk cotton yarn in light green, red, white and pink color
3 mm crochet hook
9 mm safety eyes
Polyester fiberfill
Black embroidery thread
Tapestry needle
Use light green

Head:
R1: ch 2, starting from the second chain from hook, 6 sc (6)
R2: inc, rep 6x (12)
R3: sc, inc, rep 6x (18)
R4: sc, inc, (2 sc, inc = rep 5x), sc (24)
R5: 3 sc, inc, rep 6x (30)
R6: sc around
R7: 2 sc, inc, (4 sc, inc = rep 5x), 2 sc (36)

R8-9: sc around
R10: 4 sc, dec, rep 6x (30)
R11: sc around
R12: 3 sc, dec, rep 6x (24)
R13: 2 sc, dec, rep 6x (18)
Stuff
R14: sc, dec, rep 6x (12)
R15: dec, rep 6x (6)
F/O

Body:
Use red
R1: ch 2, starting from the second chain from hook, 6 sc (6)
R2: inc, rep 6x (12)
R3: sc, inc, rep 6x (18)
R4: sc, inc, (2 sc, inc = rep 5x), sc (24)
R5-6: sc around
R7: 4 sc, dec, rep 4x (20)
R8: 8 sc, dec, rep 2x (18)
R9: sc around
R10: 4 sc, dec, rep 3x (15)
stuff
F/O leaving a long tail for sewing

Eyes
Outer eyes (make 2):

Use light green
R1: ch 2, starting from the second chain from hook, 5 sc (5)
R2: inc, rep 5x (10)
R3: sc, inc, rep 5x (15)
R4: sc around
F/O leaving a long tail for sewing.

Inner Eyes (make 2):
Use white
R1: ch 2, starting from the second chain from hook, 5 sc (5)
R2: inc, rep 5x (10)
R3-4: sc around
Attach safety eyes on the center of the eyes.
Stuff
R5: dec, rep 5x (5)
F/O Put the inner eyes into the outer eyes. Glue or sew to make the inner eyes stay in its position.

Arms (make 2):
Use light green
R1: ch 2, starting from the second chain from hook, 6 sc (6)
R2-4: sc around
Stuff
F/O leaving a long tail for sewing

Legs (make 2):
Use light green

R1: ch 2, starting from the second chain from hook, 4 sc (4)
R2: inc, rep 4x (8)
R3: sc around
Stuff
R4: flatten the last round and join front and back side by crocheting them together, (ch 1, sl st) = rep 4x
F/O 

Blushes (make 2):
Use pink
ch 2, starting from the second chain from hook, 6 sc (6)+ sl st to the 1st st
F/O leaving a long tail for sewing

Finishing:
Sew the eyes on the top of the head.
Embroider the mouth by using black thread.
Sew the body to the head.
Sew the arms on the body.
Sew or glue the legs on the body.
Sew or glue the blushes on the cheek.


This pattern is an original by me, Zan Merry. Please do not claim this pattern as your own. If you wish to share this pattern, you may link this pattern but please do not reprint it to your site or share it in a pdf or picture format.

You may keep a copy of this pattern for personal use but you may not sell the pattern. You can sell the items that you made from this pattern as you credit me as the designer.

Please leave comment if you have a question or find any mistake in my pattern. I will do the corrections as soon as possible. I will be happy to see your creation from this pattern so please share your handmade to my Facebook Page Zan Crochet or Instagram @zancrochet

Thanks...

Frog

Koko the Frog
Cute animals series
This cute frog is about 25 cm tall (from feet to eyes).

Amigurumi frog
Free amigurumi pattern


Abbreviations:
sc: single crochet    
ch: chain
St: Stitch
inc : increase
dec: decrease
sl st : slip stitch
dc-inc: double crochet increase (2 dc in one st)
F/O: Fasten off

Materials:
3 mm crochet hook
Milk cotton yarn in green, dark green, white, and red
Needle for sewing
Stuff
Scissors
12 mm safety eyes

Note: Work in continuous round

Head:
Use green
R1: ch 2, starting from second chain from hook 6 sc
R2: inc, rep 6x (12)
R3: sc, inc, rep 6x (18)
R4: sc, inc, [2 sc, inc = rep 5x], sc (24)
R5: 3 sc, inc, rep 6x (30)
R6: 2 sc, inc, [4 sc, inc = rep 5x], 2 sc (36)
R7: 5 sc, inc, rep 6x (42)
R8: 3 sc, inc, [6 sc, inc = rep 5x], 3 sc (48)
R9: 7 sc, inc, rep 6x (54)
R10: 4 sc, inc, [8 sc, inc = rep 5x], 4 sc (60)
R11: 9 sc, inc, rep 6x (66)
R12-18: sc around
R19: 9 sc, dec, rep 6x (60)
R20: 4 sc, dec, [8 sc, dec = rep 5x], 4 sc (54)
R21: 7 sc, dec, rep 6x (48)
R22: 3 sc, dec, [6sc, dec = rep 5x], 3 sc (42)
R23: 5 sc, dec, rep 6x (36)
R24: 2 sc, dec, [ 4 sc, dec = rep 5x], 2 sc (30)
R25: 3 sc, dec, rep 6x (24)
Stuff
R26: 2 sc, dec, rep 6x  (18)
R27: sc, dec, rep 6x (12)
R28: dec, rep 6x (6)
F/O

Legs and Body:
Use green
1st leg:
R1: ch 2, starting from second chain from hook 6 sc
R2: inc, rep 6x (12)
R3: sc, inc, rep 6x (18)
R4-7:  sc around
F/O
2nd Leg:
Repeat all 1st Leg step + ch 6 (this chain will be counted as stitches, front and back side)
Don’t cut the yarn because we will continue to crochet both legs together in next round)
Body:
R8: sc in all stitches of 1st leg (18), sc in each chain stitches (6), sc in all stitches of 2nd leg (18), sc in each chain stitches (6) (48 in total)
R9-12: sc around
Stuff the legs
R13: 6 sc, dec, rep 6x (42)
R14-15: sc around
R16: 19 sc, dec, rep 2x (40)
R17-18: sc around
R19: 18 sc, dec, rep 2x  (38)
R20-21: sc around
R22: 17 sc, dec, rep 2x (36)
R23-24: sc around
R25: 4 sc, dec, rep 6x (30)
R26: sc, dec, [3 sc, dec = rep 5x], 2 sc (24)
R27: sc around
Stuff
F/O leaving a long tail for sewing

Arms (make 2):
Use green
R1: ch 2, starting from second chain from hook 6 sc (6)
R2: inc, rep 6x (12)
R3: 3 sc, inc, rep 3x (15)
R4-6: sc around
R7: 3 dec, 9 sc (12)
R8: 2 dec, 8 sc (10)
stuff
R9-18: sc around
stuff
close the hole by joining front and back side of stitches with sl st
F /O leaving a long tail for sewing


Feet (make 2):
Use green
R1: ch 2, starting from second chain from hook 6 sc (6)
R2: sc, inc, rep 3x (9)
R3: 2 sc, inc, rep 3x (12)
R4: 3 sc, inc, rep 3x (15)
R5: 4 sc, inc, rep 3x (18)
R6-7: sc around
R8:  Flat the foot, then insert your hook through the two stitches (front and back side). Then, crochet (sc, dc-inc, sc), rep 3x
F/O

Eyeballs (make 2):
Use white
R1: ch 2, starting from second chain from hook 6 sc
R2: inc, rep 6x (12)
R3: sc, inc, rep 6x (18)
R4-5: sc around
R6: sc, dec, rep 6x (12)
attach safety eyes in center of R1
stuff
R7: dec, rep 6x (6)
F/O

Eyelids (make 2):
Use green
R1: ch 2, starting from second chain from hook 6 sc (6)
R2: inc, rep 6x (12)
R3: sc, inc, rep 6x (18)
R4: 8 sc, inc, rep 2x (20)
R5-6: sc around
F/O leaving along tail for sewing

Bow: 
Use red
R1: ch 11, starting from 4th chain from hook,  dc in each sts (first ch 3 counted as a stitch)
R2-6: ch 3, turn, dc in each sts
F/O leaving a long tail for sewing

Spots:
Use dark green (make as many as you need)
1st spot: ch 2, starting from second chain from hook 6 sc (6) F/O
2nd spot: ch 2, starting from second chain from hook 5 sc (5) F/O
3rd spot: ch 2, starting from second chain from hook 4 sc (4) F/O

Finishing:
  • Sew body to head.
  • Sew eyeball in eyelids. Then, sew eyes on top of head.

  • Sew feet to the legs.
  • Sew the arms to body.
  • Sew some spots on its body.
  • Sew the bow.
  • Use black yarn to embroider the mouth.

      This pattern is an original by me, Zan Merry. Please do not claim this pattern as your own. If you wish to share this pattern, you may link this pattern but please do not reprint it to your site or share it in a pdf or picture format.

      You may keep a copy of this pattern for personal use but you may not sell the pattern. You can sell the items that you made from this pattern as you credit me as the designer.

      Please leave comment if you have a question or find any mistake in my pattern. I will do the corrections as soon as possible. I will be happy to see your creation from this pattern so please share your handmade to my Facebook Page Zan Amigurumi or Instagram @zancrochet

      Thanks...

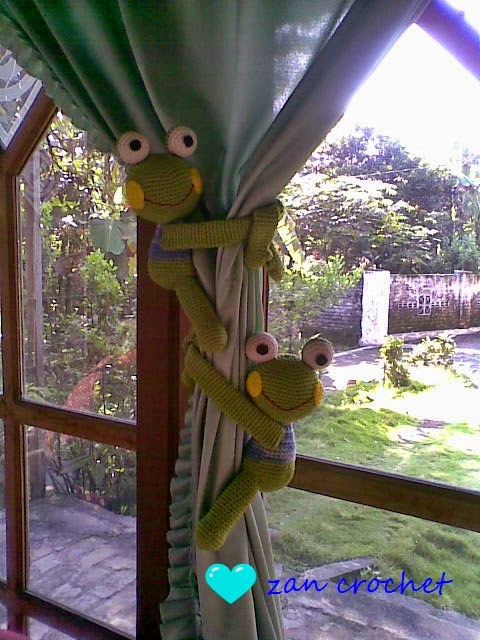
    Frog curtain Tie Back

    I really love these frogs.. They are so cute.. The pattern is so easy to follow... You can decor your home using this frog...  I hope you will love this frog too...
    Please join my page on Facebook  Zan Amigurumi and share your creation from this pattern there...
    Happy crocheting...
    For Dutch Version click here

    Materials needed:
    Yarn in green, white, blue, yellow and red
    crochet hook
    Polyester fiberfill
    Needle for sewing
    Marker
    Black felt for making eyes
    Glue
    Scissor

    Abbreviations:
    sc = single crochet
    inc = increase
    dec = decrease
    sl st = slip stitch
    R= round
    CC = change color
    F/O = fasten off
    DCC: double crochet cluster
    How to make dc cluster


    Note: This project is working in continuous rounds.  Mark first stitch of each round

    Head:
    Using green
    R1: ch 2, starting from second chain from hook 6 sc
    R2: inc, rep 6x (12)
    R3: sc, inc, rep 6x (18)
    R4: 2sc, inc, rep 6x (24)
    R5: 3sc, inc, rep 6x (30)
    R6: 4sc, inc, rep 6x (36)
    R7: 5sc, inc, rep 6x (42)
    R8: 6sc, inc, rep 6x (48)
    R9: 7sc, inc, rep 6x (54)
    R10: 8sc, inc, rep 6x (60)
    R11-18: sc around (60)
    R19: 8sc, dec, rep 6x (54)
    R20: 7sc, dec, rep 6x (48)
    R21: 6sc, dec, rep 6x (42)
    R22: 5sc, dec, rep 6x (36)
    R23: 4sc, dec, rep 6x (30)
    R24: 3sc, dec, rep 6x (24)
    R25: 2sc, dec, rep 6x (18)
    Stuff
    F/O

    Eyes (make 2):
    Using white
    R1: ch 2, starting from second chain from hook 6 sc
    R2: inc, rep 6x (12)
    R3: sc, inc, rep 6x (18)
    R4: 2sc, inc, rep 6x (24)
    R5: sc around
    CC to green
    R6-7: sc around
    R8: 2sc, dec, rep 6x (18)
    R9: sc, dec, rep 6x (12)
    Stuff
    R10: dec, rep 6x (6)
    F/O leave long tail for sewing

    Body:
    Using green
    R1: ch 2, starting from second chain from hook 6 sc
    R2: inc, rep 6x (12)
    R3: sc, inc, rep 6x (18)
    R4: 2sc, inc, rep 6x (24)
    R5: 3sc, inc, rep 6x (30)
    R6: 4sc, inc, rep 6x (36)
    R7: 5sc, inc, rep 6x (42)
    R8: 6sc, inc, rep 6x (48)
    R9-11: sc around
    R12:  6sc, dec, rep 6x (42)
    R13: sc around
    CC to blue

    R14: 5sc, dec, rep 6x (36)
    R15-16: sc around
    R17:  4sc, dec, rep 6x (30)
    R18: sc around
    R19:  3sc, dec, rep 6x (24)
    R20-22: sc around
    R23:  2sc, dec, rep 6x (18)
    R24: sc around
    Stuff
    F/O leave long tail for sewing

    Hands (make 2):
    Using green
    R1: ch 2, starting from second chain from hook 6 sc
    R2: inc, rep 6x (12)
    R3: sc, inc, rep 6x (18)
    R4: sc around
    R5: 7sc, dec, rep 2x (16)
    R6: 6sc, dec, 6sc, dcc (see diagram above how to make it), sc (15)
    R7: 13 sc, dec (14)
    Stuff with little polyester fiberfill
    R8-63: sc around
    Don't stuff the hands
    F/O leave long tail for sewing

    Legs (make 2):
    Using green
    R1: ch 2, starting from second chain from hook 6 sc
    R2: inc, rep 6x (12)
    R3: sc, inc, rep 6x (18)
    R4: 2sc, inc, rep 6x (24)
    R5-7: sc around
    R8: 2sc, dec, rep 6x (18)
    R9-25: sc around
    Stuff
    F/O leave long tail for sewing

    Blush Circles (Make 2):
    Using yellow
    R1: ch 2, starting from second chain from hook 6 sc
    R2: inc, rep 6x (12)
    R3: sc, inc, rep 6x (18) + sl st
    F/O leaving long tail for sewing

    Assembly:


    - sew the frog's eyes on the head
    - Cut out 2 black felt and glue them onto frog's eyes with some fabric glue.
    - Sew the blush to the frog's head
    - Sew the mouth between the blushes with red yarn
    - Sew the body to the head
    - Sew the hands and the legs to the frog's body (see the picture below for the position of the hands and legs)
    - Add red ribbon to the body (optional)

     And congratulation you've completed your amigurumi frog curtain tie back.

    This pattern is made by me, Zan Merry. If you wish to share this pattern, you may link this pattern but please do not reprint it to your site. You may keep a copy of this pattern for personal use but you may not sell this pattern. You can sell the items that you made from this pattern as you credit me as the designer.

    Please leave comment if you have a question or you can email me to cintaku.zanee@gmail.com

    If you find some mistake in my  pattern, please tell me... I will do the corrections. I will be happy to see your creation from this pattern so please share your handmade to me...
    sealkazzsoftware.blogspot.com resepkuekeringku.com