Brown Teddy

Cute Teddy....
This pattern is made by Carla Atmadja, ---> https://www.facebook.com/carla.atmadja
You will need:
Brown yarn in any type/size
Hook suitable for the yarn.
Tapestry needle
Scissor
Polyester fiberfill
Safety eyes (small black beads or black yarn to embroider the eyes)
White felt for the snout

Abbreviations:
MR: magic ring
sc: single crochet 
ch: chain
st: stitch
inc: increase
dec: decrease
hdc: half double crochet
BLO: work on back loop only
sl st: slip stitch
F/O: Fasten off
R: Round

Head:
R1: MR, 6 sc  (6)
R2: inc, rep 6x  (12)
R3: sc ,inc rep 6x  (18)
R4:2 sc, inc, rep 6x (24)
R5: 2 sc, inc, rep 8x (32)
R6: 7 sc, inc, rep 4x (36)
R7: inc, 17 sc, rep 2x (38)
R8: inc, 18 sc, rep 2x (40)
R9: inc, 19 sc, rep 2x (42)
R10: inc, 20 sc, rep 2x (44)
R11-12: sc around (44)
Attach safety eyes between R10 and R11, give 2 sts between them
R13: dec, 20 sc, rep 2x (42)
R14: dec, 19 sc, rep 2x (40)
R15-16: sc around (40)
R17: 3 sc, dec, rep 8x (32)
R18: dec, 14 sc, rep 2x (30)
R19: 3 sc, dec, rep 6x (24),
stuff
F/O

Ears (make 2):
R1: MR, 5 sc (5)
R2: (inc) 5x  (10)
R3-4: sc around   (10)
Stuff
F/O, leaving a long tail for sewing.

Legs (make 2):
ch 6
R1: starting from 2nd chain from hook, 4 sc, 3 sc in the corner, continue your work st around the other side of chain, 3 sc, 2 sc in last st. (12)
R2: sc, inc, rep 6x (18)
R3: Work in BLO, hdc around (18)
R4: sc around (18)
R5: 6 sc, 3 dec, 6 sc  (15)
R6-11: sc around (15)
F/O the first leg
Make the second legs. Don’t cut the yarn, we're going to crochet both legs together and continue to work body.
Body
ch 1 (this chain will be counted as 2 sts (back and front side)
R12: join 1 st leg, sc around 1st leg (make sure that you put both legs in same position, sc in ch st (back side), sc around in 2nd leg sts, sc in ch st (front side) (32)
R13: dec, 14 sc, rep 2x (30)
R14-18: sc around (30)
R19: dec, 13 sc, rep 2x (28)
R20: sc around (28)
R21: dec, 12 sc, rep 2x  (26)
R22: sc around (26)
R23: dec, 11 sc, rep 2x    (24)
R24: sc around (24)
stuff
F/O, leaving a long tail for sewing.

Hands (make 2):
R1: MR, 5 sc  (5)
R2: (inc) 5x    (10)
R3-10: sc around (10),
stuff
F/O, leaving a long tail for sewing.

 
Tail:
R1: MR, 6 sc  (6)
R2: sc, inc, rep 3x (9)
R3-4: sc around (9)
R5: sc, dec, rep 3x (6)
stuff
F/O leaving a long tail for sewing

Finishing:

  • Sew the ears on R3 on right and left side of the head. Cut small light brown felt in half round shape, glue them on ears.
  • If you use black yarn instead of safety eyes, embroider it on R10 or sew small black beads to make eyes.
  • Cut a white piece of felt in oval shape and embroider black line to make nose and mouth. Glue it on R11 on the head, under both eyes.
  • Sew body to head.
  • Sew the hands on sides of body.
  • sew the tail on back side of body.
This pattern is made by Carla Atmadja, ---> https://www.facebook.com/carla.atmadja
I have had permission from her to share this pattern publicly in Belajar amigurumi blog for Indonesian version and Zan crochet blog for English version.

Please do not claim this pattern as your own. If you want to share this pattern, just share the link of this blog site and do not share it in picture, pdf version or rewrite on any other site or blog. You may save the copy of this pattern for personal use only. You are not permitted to sell the items that you make from this pattern without permission  for the designer.

Thanks.

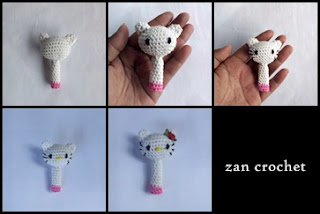
Hello Kitty Pencil Topper

Simple and easy... but very cute..

Don't forget to like my Facebook Page Zan Amigurumi and Instagram @zancrochet for sharing your creation or getting information about my patterns.


Materials needed:
Yarn in white and pink
2 mm crochet hook
Polyester fiberfill
Stitch marker for working in the round
Needle for sewing
Black and yellow embroidery thread
Scissor
Small flower for accessory
Glue

Abbreviations:
sc = single crochet
inc = increase
dec = decrease
ch = chain
st = stitch 
R = round
CC = change color

Note: This project is working in continuous rounds

Head:
Use white
ch 6
R1: starting from 2nd chain from hook, 4 sc, 3 sc in last st, continue your work st around the other side of chain, 3 sc, 2 sc in last st. (12)
R2: inc, 3 sc, 3 inc, 3 sc, 2 inc (18)
R3: inc, 6 sc, 3 inc, 6 sc, 2 inc (24)
R4: inc, 7 sc, inc, sc, inc, sc, inc, 7 sc, inc, sc, inc, sc (30)
R5-7: sc around
R8: dec, 7 sc, dec, sc, dec, sc, dec, 7 sc, dec, sc, dec, sc (24)
R9: dec, 6 sc, 3 dec, 6 sc, 2 dec (18)
stuff
R10: sc, dec, rep 6x (12)
Add more stuff
R11: dec, rep 6x (6)
Continue working for pencil cover

Cover:
R12: sc, inc, rep 3x (9)
R13-20: sc around
CC to pink
R21-22: sc around
F/O you can adjust the length of cover by increase or decrease the round.

Ears (make 2):
Use white
R1: ch 2, starting from second chain from hook 4 sc
R2: sc, inc, rep 2x (6)
R3: 2 sc, inc, rep 2x (8)
F/O leaving a long tail for sewing

Finishing:
-    Sew the ears on the head
-    By using black embroidery thread, sew the eyes. Continue sewing whiskers.
-    By using yellow embroidery thread, sew nose between eyes
-    Add accessories on the head


This pattern is an original by me, Zan Merry. Please do not claim this pattern as your own. If
you wish to share this pattern, you may link this pattern but please do not reprint it to your site.
You may keep a copy of this pattern for personal use but you may not sell this pattern. You can
sell the items that you made from this pattern as you credit me as the designer.
Please leave a comment if you have a question or find any mistake in my pattern,  I will answer your question or do correction as soon as possible.. I will be happy to see your creation from this pattern so please share your handmade to my Facebook Page Zan Amigurumi or Instagram @zancrochet
Thanks...

Cow

Cute Animals series - Cow
See also other cute animals: Bear and Panda
I am so happy that i can add another animal to cute animal series. Amigurumi cow is one of my favorite, so i made this cow pattern as a request of my own self.. :D I hope you can enjoy the pattern..
Don't forget to like my Facebook page Zan Amigurumi and Instagram @zancrochet to get more information about my pattern.


Abbreviations:
sc: single crochet   
ch: chain
st: Stitch
inc : increase
dec: decrease
sl st : slip stitch
CC: change color
F/O: Fasten off

Materials:
2 mm crochet hook
yarn in brown, white, pink  and dark brown
Needle for sewing
Stuff
Scissors
6mm safety eyes

Note: Work in continuous round


Head:
Use white
R1: ch 2, starting from second chain from hook 6 sc
R2: inc, rep 6x (12)
R3: sc, inc, rep 6x (18)
R4: sc, inc, [2 sc, inc = rep 5x], sc (24)
R5: 3 sc, inc, rep 6x (30)
R6: 2 sc, inc, [4 sc, inc = rep 5x], 2 sc (36)
R7: 5 sc, inc, rep 6x (42)
R8: 3 sc, inc, [6 sc, inc = rep 5x], 3 sc (48)
R9: 7 sc, inc, rep 6x (54)
R10: 4 sc, inc, [8 sc, inc = rep 5x], 4 sc (60)
R11: 9 sc, inc, rep 6x (66)
R12-18: sc around
Attach safety eyes between R14 and 15 and give 19 stitches between them
R19: 9 sc, dec, rep 6x (60)
R20: 4 sc, dec, [8 sc, dec = rep 5x], 4 sc (54)
R21: 7 sc, dec, rep 6x (48)
R22: 3 sc, dec, [6sc, dec = rep 5x], 3 sc (42)
R23: 5 sc, dec, rep 6x (36)
R24: 2 sc, dec, [ 4 sc, dec = rep 5x], 2 sc (30)
R25: 3 sc, dec, rep 6x (24)
Stuff
F/O

Legs and Body:
1st leg:
Use brown
R1: ch 2, starting from second chain from hook 6 sc
R2: inc, rep 6x (12)
R3: sc, inc, rep 6x (18)
R4-5:  sc around
R6-7: CC to white, sc around
F/O
2nd Leg:
Repeat all 1st Leg step + ch 6 (this chain will be counted as stitches, front and back side)
Don’t cut the yarn because we will continue to crochet both legs together in next round)
Body:
R8: sc in all stitches of 1st leg (18), sc in each chain stitches (6), sc in all stitches of 2nd leg (18), sc in each chain stitches (6) (48 in total)
R9-12: sc around
Stuff the legs
R13: 6 sc, dec, rep 6x (42)
R14-15: sc around
R16: 19 sc, dec, rep 2x (40)
R17-18: sc around
R19: 9 sc, dec, 18  sc, dec, 9 sc (38)
R20-21: sc around
R22: 17 sc, dec, rep 2x (36)
R23-24: sc around
R25: 4 sc, dec, rep 6x (30)
R26: sc around
R27: sc, dec, [3 sc, dec = rep 5x], 2 sc (24)
Stuff
F/O leaving a long tail for sewing

Hands (make 2):
Use brown
R1: ch 2, starting from second chain from hook 6 sc
R2: inc, rep 6x (12)
R3: 3 sc, inc, rep 3x (15)
R4-5: sc around
R6: CC to white, 3 sc, dec, rep 3x (12)
R7-16: sc around
Stuff
Crochet both sides together by using sl st to close the hole
F/O

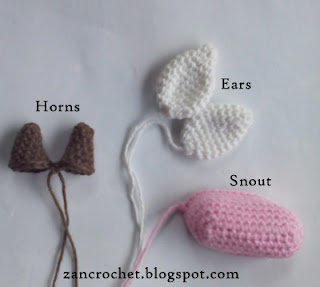
Ears (make 2):
Use white
R1: ch 2, starting from second chain from hook 6 sc
R2: sc around
R3: sc, inc, rep 3x (9)
R4: 2 sc, inc, rep 3x (12)
R5: 3 sc, inc, rep 3x (15)
R6: sc around
R7: 4 sc, inc, rep 3x (18)
R8-10: sc around
R11: sc, dec, rep 6x (12)
R12: dec , rep 6x (6)
F/O Leaving a long tail for sewing
Horns (make 2):
Use dark brown
R1: ch 2, starting from second chain from hook 6 sc
R2: sc around
R3: inc, 5 sc (7)
R4: inc, 6 sc (8)
R5: inc, 7 sc (9)
R6: inc, 8 sc (10)
Stuff
F/O Leaving a long tail for sewing

Snout:
Use pink
Ch 12
R1: starting from 2nd chain from hook, 10 sc, 3 sc in last st, continue your work st around the other side of chain, 9 sc, 2 sc in last st. (24)
R2: inc, 9 sc, 3 inc, 9 sc, 2 inc (30)
R3: sc, inc, 10 sc, inc, sc, inc, sc, inc, 10 sc, inc, sc, inc (36)
R4-7: sc around
Stuff
F/O leaving a long tail for sewing

Udders:
Use pink
Main Part:
R1: ch 2, starting from second chain from hook 6 sc
R2: inc, rep 6x (12)
R3: sc, inc, rep 6x (18)
R4: sc, inc, [2 sc, inc = rep 5x], sc (24)
R5-6: sc around
Stuff
F/O leaving a long tail for sewing

Small Parts (make 4):
R1: ch 2, starting from second chain from hook 5 sc
R2-3: sc around
F/O leaving a long tail for sewing

Spots:
Use brown
Part 1 (make 2)
R1: ch 2, starting from second chain from hook 6 sc
R2: inc, rep 6x (12)
R3: sc, inc, rep 6x (18)
R4: sc, inc, [2 sc, inc = rep 5x], sc (24)
R5:  inc, 3 sc, rep 6x (30)
F/O leaving a long tail for sewing
Part 2 (make 2):
R1: ch 2, starting from second chain from hook 2 sc (2) ch 1, turn
R2: inc in each sts (4) ch 1, turn
R3: sc in each sts (4) ch 1, turn
R4: inc, 2 sc, inc (6) ch 1, turn
R5-6: sc in each sts (6) ch 1, turn
R7: dec, 2 sc, dec (4) ch 1, turn
R8: sc in each sts (4) ch 1, turn
R9: 2 dec (2) ch 1, turn
R10: dec (1)
F/O leaving a long tail for sewing

Tail:
Use white
R1: ch 2, starting from second chain from hook 5 sc
R2-10: sc around
F/O leaving a long tail for sewing

Finishing:
  • Sew body to head
  • Sew the snout between eyes
  • Sew one round spot on head
  • Sew the horns on head.
  • Sew the ears to the head.
  • Sew the hands to body
  • Sew the main part of udder to body then sew the small parts on main part.
  • Sew the 2nd piece of part 1 spot on left side of body underneath the arm and one piece of 2nd part on right side of body. Sew the last piece of 2nd part of spot on the back side of head.

  • Sew some pieces of brown yarn to tail, brush it to make hair, then sew the tail on the back side of body.
  • Sew nose and mouth
This pattern is an original by me, Zan Merry. Please do not claim this pattern as your own. If you wish to share this pattern, you may link this pattern but please do not reprint it to your site or media social. You may keep a copy of this pattern for personal use but you may not sell this pattern. You can sell the items that you made from this pattern as you credit me as the designer.
Please leave comment if you have a question or  find some mistake in my pattern. I will answer your question or do the corrections as soon as I get online. I will be happy to see your creation from this pattern so please share your handmade to my Facebook page Zan Amigurumi or Instagram @zancrochet
Thanks...

Special thanks to my friend, Yanni Galka, for helping me trying this pattern.

Kleine Meisjes

Deze pop is ca. 11 cm groot het originele patroon is een hijab meisje, maar kan aangepast worden.
Bezoek alstublieft mijn facebook pagina Zan Amigurumi of volg me op Instagram @zancrochet voor meer
informatie over mijn gratis patronen , en deel uw creaties op mijn blog.
Voor Indonesia versie, klik disini.
For English version click here 

♥ Vertaald door Jeannette Kemp ♥ https://www.facebook.com/groups/Creaties/

Afkortingen:
v: vaste
-l: losse
St: Steek
2v in 1st : meerderen
2v-samen: minderen
hv : halve vaste
hstk: half stokje
stk: double crochet
2stk in 1st: stk meerderen
afk: afkanten
FLO: voorste lus
BLO: achterste lus
R: Rij / ronde
herh: herhaal

Materiaal:
2 mm haaknaald
Garen in diverse kleuren (huidkleur , zwart voor het haar en een kleur voor de jurk)
naainaald
Vulling
Kleine zwarte kralen als ogen

Notitie: haak in spiraal rondes


Voeten en Benen (x 2):
blauw 4-losse
Werk rondom de keten
R1: 1v in 2e l v/d nld, 1v in volg st, 3v in de hoek, 1v in volg st, 2v in laatste st (8)
R2: 2v in 1st, 1v, [2v in 1st = 3x], 1v, [2v in 1st = 2x] (14)
R3: v rond
R4: 3v, [2v-samen = 4x], 3v (10) vullen
R5: 3v, [2v-samen =2x], 3v (8)
verder met huidkleur
R6-12: v rond
vullen
afkanten

Lijf:
In de volgende ronde haken we de benen samen
R13: met licht blauw, v rond in 2e been, v rond in 1e been
(aanhechten kan in elke st let op de positie van de voeten) (16)
R14-15: v rond
R16: BLO, v rond
R17-18: v rond
R19: 2v, 2v-samen, herh 4x (12)
vullen
R20: 1v, 2v-samen, herh 4x (8)
R21-22: verder met huidkleur, v rond
vullen
Haak verder aan het hoofd.

Hoofd:
R23: 2v in 1st, herh 8x (16)
R24: 1v, 2v in 1st, herh 8x (24)
R25: 2 v, 2v in 1st, herh 8x (32)
R26-31: v rond
R32: 2v, 2v-samen, herh 8x (24)
R33: 2v, 2v-samen, herh 6x (18)
vullen
R34: 1v, 2v-samen, herh 6x (12)
vullen
R35: 2v-samen, herh 6x (6)
Afkanten.

Armen (x 2):
met huidkleur
R1: 6v in de opzet
R2: v rond
Met licht blauw
R3-9: v rond
Matig vullen
Afkanten met lange draad.
Naai de armen aan het lijf.

Rok:
met licht blauw.
Start in FLO van R15
R1: v rond, sluit m/hv (16)
R2: 3-l (=1 stk), 2stk in 1st, [1stk, 2stk in 1st = herh 7x], sluit m/hv (24)
26-2-2017 Little Girl ~ Zan Crochet
♥ Vertaald door Jeannette Kemp ♥ https://www.facebook.com/groups/Creaties/ 3/4
R3: 3-l, 1stk, 2stk in 1st, [2stk, 2stk in 1st = rep 7x], sluit m/hv (32)
R4: 3-l, 2stk, 2stk in 1st, [3stk, 2stk in 1st = rep 7x], sluit m/hv (40)
R5: 3-l, 3stk, 2stk in 1st, [4stk, 2stk in 1st = rep 7x], sluit m/hv (48)
R6: 3-l, 47 stk, sluit m/hv (48)
Verder met geel
R7: v rond
afkanten
Muts: licht blauw
R1: 6v in de opzet
R2: 2v in 1st, herh 6x (12)
R3: 1v, 2v in 1st, herh 6x (18)
R4: 2v, 2v in 1st, herh 6x (24)
R5: 2v, 2v in 1st, herh 8x (32)
R6-10: v rond
R11: 4v, 1hstk, 22stk, 1hstk, 4v (32) op het hoofd plaatsen.
R12: 3v, 6-l, v in 29e st van R11, 2v (12) (losse aan de
voorkant v/d nek)
R13: v rond (12)
R14: 1v, 2v in 1st, herh 6x (18)
R15: 2v, 2v in 1st, herh 6x (24)
R16: 3v, 2v in 1st, herh 6x (30)
R17: 4 v, 2v in 1st, herh 6x (36)
R18: verder met geel, v rond
Afkanten.
afwerking:
plaats de ogen.
Borduur de neus / mond.
Versier naar eigen voorkeur (optie)
Voeg nog een ronde met contrastkleur toe in R11.

aanpassingen:
Haar/deel 1: met zwart
R1: 6v in de opzet
R2: 2v in 1st, herh 6x (12)
R3: 1v, 2v in 1st, herh 6x (18)
R4: 2v, 2v in 1st, herh 6x (24)
R5: 2v, 2v in 1st, herh 8x (32)
R6-12: v rond
Afkanten met lange draad.

Krullend Haar/deel 2:
Met zwart; maak 2 of meer krullen
20-losse
R1: start in 2e l v/d nld, 2v in elke st .
Afkanten met lange draad .
afwerking:
Naai deel 1 op het hoofd.
Naai de krullen op deel 1, ( waar u wilt, onderkant zijkant of bovenop)

Hand kleur :
Zie patroon
R1-6: huidkleur
R7-9: kleding kleur
Rok: voor een korte rok haak t/m R3.

Voeg als optie nog een ronde met contrastkleur. dit patroon (een hijab meisje) is gemaakt door Shithi Sofwan, de aangepaste versie gemaakt door administratie Team van Facebook groep Belajar Amigurumi Bareng yukk met permissie v/d designer voor de aanpassingen van het originele patroon. Dit kleine meisje is gepubliceerd in Belajar amigurumi blog voor Indonesische versie en Zan crochet blog voor Engelse versie, en Nederlandse vertaling. Claim dit patroon niet als uw eigen.Wilt U delen? Deel de link naar deze blogsite en niet het patroon zelf in welke vorm dan ook. U mag de pop verkopen, met krediet voor Shithi Shofwan als designer. Het is verboden dit patroon te verkopen en / of te publiceren.

 ♥ Vertaald door Jeannette Kemp ♥ https://www.facebook.com/groups/Creaties/

Easter Bunny

This cute bunny can be a good choice for your Easter decoration or gift. The pattern is so simple and easy, very suitable for beginner. I almost could not stop my self in making them :D
Don't forget share your creation to my Facebook page Zan Amigurumi or Instagram @zancrochet

Materials needed:
Yarn in any color (main color and contrasting color, multi color yarn for making eggs)
2 mm crochet hook
Polyester fiberfill
Stitch marker for working in the round
Needle for sewing
8 mm safety eyes
Scissor

Abbreviations:
sc = single crochet
inc = increase
dec = decrease
st = stitch
ch = chain
skp = skip
R = round
CC = change color
BLO = back loops only
FO = fasten off

Note: This project is working in continuous rounds.

Head and Body:
Using white
R1: ch 2, starting from second chain from hook 6 sc
R2: inc, rep 6x (12)
R3: sc, inc, rep 6x (18)
R4: 2 sc, inc, rep 6x (24)
R5: 3 sc, inc, rep 6x (30)
R6: sc around
R7: 4 sc, inc, rep 6x (36)
R8: sc around
R9: 5 sc, inc, rep 6x (42)
R10: sc around
R11: 6 sc, inc, rep 6x (48)
R12-16: sc around
R17: 3 sc, inc, rep 12x (60)
R18-19: sc around
R20: 9 sc, inc, rep 6x (66)
R21-27: sc around
If you are using safety eyes, attach them in between R9 – R10, leaving 8 sts between them.
R28: 9 sc, dec, rep 6x (60)
R29: 8 sc, dec, rep 6x (54)
R30: BLO, 7 sc, dec, rep 6x (48)
R31: 6 sc, dec, rep 6x (42)
R32: 5 sc, dec,rep 6x (36)
R33: 4 sc, dec, rep 6x (30)
R34: 3 sc, dec, rep 6x (24)
stuff
R35: 2 sc, dec, rep 6x (18)
R36:, sc, dec, rep 6x (12)
Add more stuff
R37: dec, rep 6x (6)
F/O

Ears (make 2):
Use main color
R1: ch 2, starting from second chain from hook 6 sc
R2: sc around
R3: sc, inc, rep 3x (9)
R4: sc around
R5: 2 sc, inc, rep 3x (12)
R6: sc around
R7: 3 sc, inc, rep 3x (15)
R8: sc around
R9: 4 sc, inc, rep 3x (18)
R10-19: sc around
R20: sc, dec, rep 6x (12)
R21: 2 sc, dec, rep 3x (9)
F/O leaving a long tail for sewing

Inner Ears (make 2):
Use contrasting color:
R1: ch 2, starting from second chain from hook 2 sc
R2 : ch 1, turn, sc in each sts
R3: ch 1, turn, inc in each sts (4)
R4-8: ch 1, turn, sc in each sts
R9: ch 1, turn, dec = 2x (2)
R10: ch 1, turn, dec
F/O leaving a long tail for sewing

Hands (make 2):
Use main color
R1: ch 2, starting from second chain from hook 5 sc
R2: inc, rep 5x (10)
R3: sc, inc, rep 5x (15)
R4-5: sc around
R6: sc, dec, rep 5x (10)
Stuff
R7-16: sc around
Add more a little stuff.
F/O leaving a long tail for sewing.  Close the hole by sewing both side of hand. Don’t cut the yarn. We will use it for sewing  hand to body.

Legs (make 2):
Use main color
R1: ch 2, starting from second chain from hook 6 sc
R2: inc, rep 6x (12)
R3: sc, inc, rep 6x (18)
R4: sc, inc, [2 sc, inc = rep 5x], sc (24)
R5: work in BLO, sc around
R6: sc around
R7: 8 sc, 4 dec, 8 sc (20)
R8: 6 sc, 4 dec, 6 sc (16)
R9-10:  sc around
Stuff
F/O leaving a long tail for sewing

Tail:
Use main color
R1: ch 2, starting from second chain from hook 6 sc
R2: inc, rep 6x (12)
R3: sc, inc, rep 6x (18)
R4-5: sc around
Stuff
F/O leaving a long tail for sewing

Easter eggs (make several):
I used multi color yarn
R1: ch 2, starting from second chain from hook 6 sc
R2: inc, rep 6x (12)
R3: sc, inc, rep 6x (18)
R4: sc around
R5: 2 sc, inc, rep 6x (24)
R6-7: sc around
R8: 2 sc, dec, rep 6x (18)
R9: sc around
Stuff
R10: sc, dec, rep 6x (12)
R11: dec, rep 6x (6)
F/O

Finishing:
Sew nose, mouth and eyebrows to make face.
Sew inner ears on the ears.
Sew the ears on the head.
Sew the hands on the sides of its body.
Sew the legs in front part of body.
Sew the tail on the back side part of body.
This pattern is an original by me, Zan Merry. Please do not claim this pattern as your own. If
you wish to share this pattern, you may link this pattern but please do not reprint it to your site.
You may keep a copy of this pattern for personal use but you may not sell this pattern. You can
sell the items that you made from this pattern as you credit me as the designer.
Please leave comment if you have a question or find any mistake in my pattern. I will do the corrections as soon as posibble.
Don't forget to like my Facebook page Zan Amigurumi and Instagram @zancrochet
Thanks...

sealkazzsoftware.blogspot.com resepkuekeringku.com