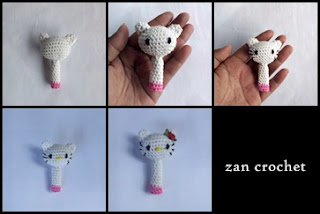
Don't forget to like my Facebook Page Zan Amigurumi and Instagram @zancrochet for sharing your creation or getting information about my patterns.
Materials needed:
Yarn in white and pink
2 mm crochet hook
Polyester fiberfill
Stitch marker for working in the round
Needle for sewing
Black and yellow embroidery thread
Scissor
Small flower for accessory
Glue
Abbreviations:
sc = single crochet
inc = increase
dec = decrease
ch = chain
st = stitch
R = round
CC = change color
Note: This project is working in continuous rounds
Head:
Use white
ch 6
R1: starting from 2nd chain from hook, 4 sc, 3 sc in last st, continue your work st around the other side of chain, 3 sc, 2 sc in last st. (12)
R2: inc, 3 sc, 3 inc, 3 sc, 2 inc (18)
R3: inc, 6 sc, 3 inc, 6 sc, 2 inc (24)
R4: inc, 7 sc, inc, sc, inc, sc, inc, 7 sc, inc, sc, inc, sc (30)
R5-7: sc around
R8: dec, 7 sc, dec, sc, dec, sc, dec, 7 sc, dec, sc, dec, sc (24)
R9: dec, 6 sc, 3 dec, 6 sc, 2 dec (18)
stuff
R10: sc, dec, rep 6x (12)
Add more stuff
R11: dec, rep 6x (6)
Continue working for pencil cover
 Cover:
R12: sc, inc, rep 3x (9)
R13-20: sc around
CC to pink
R21-22: sc around
F/O you can adjust the length of cover by increase or decrease the round.
Ears (make 2):
Use white
R1: ch 2, starting from second chain from hook 4 sc
R2: sc, inc, rep 2x (6)
R3: 2 sc, inc, rep 2x (8)
F/O leaving a long tail for sewing
Finishing:
- Sew the ears on the head
- By using black embroidery thread, sew the eyes. Continue sewing whiskers.
- By using yellow embroidery thread, sew nose between eyes
- Add accessories on the head
This pattern is an original by me, Zan Merry. Please do not claim this pattern as your own. If
you wish to share this pattern, you may link this pattern but please do not reprint it to your site.
You may keep a copy of this pattern for personal use but you may not sell this pattern. You can
sell the items that you made from this pattern as you credit me as the designer.
Please leave a comment if you have a question or find any mistake in my pattern, I will answer your question or do correction as soon as possible.. I will be happy to see your creation from this pattern so please share your handmade to my Facebook Page Zan Amigurumi or Instagram @zancrochet
Thanks...


hi
ReplyDeleteyour pattern seems to be a rubic cube !!!
the method of your pattern writing is not standard , transparent , user friendly & understandable .
after 10 year , i could not follow the pattern until end .
please revise .
here u can see a fluent pattern of something ball shape for crochet topper :
15-round ball
1. Into a magic ring, ch 1, make 7 sc. (7)
2. Make 2 hdc in each st around. (14)
3. *Make 2 hdc in the next st, hdc in the next st* 7 times. (21)
4. *Make 2 hdc in the next st, hdc in the next 2 sts* 7 times. (28)
5. *Make 2 hdc in the next st, hdc in the next 3 sts* 7 times. (35)
6. Hdc in each stitch. (35)
7. Hdc in each stitch. (35)
8. Hdc in each stitch. (35)
9. Hdc in each stitch. (35)
10. Hdc in each stitch. (35)
11. *Hdc2tog, hdc in the next 3 sts* 7 times. (28)
12. *Hdc2tog, hdc in the next 2 sts* 7 times. (21)
13. *Hdc2tog, hdc in the next st* 7 times. This is a good time to start stuffing your ball. (14)
14. Hdc2tog 7 times. Continue stuffing as you work. (7)
15. Hdc2tog 3 times. Leave the remaining stitch unworked and skip ahead to the Finishing section below. (4)
Finishing
Fasten off, leaving a 4" (10 cm) tail of yarn. Use a yarn needle and the end tail of yarn to close the hole formed by the last 4 stitches. Make sure that your ball is well stuffed before closing it completely. Work away your tails of yarn.
wish u the best .
hello.. my HK topper is not in ball shape but oval shape.. :D
Delete