Showing posts with label flower. Show all posts

Amigurumi Pokemon Spheal


Pokemon Spheal

Pokemon #363 It's ice and water type Pokemon. It is spherical, chubby and cute seal-like Pokemon. 

This pattern use US terminology.

Skill level: beginner


Abbreviations:
sc: single crochet    
ch: chain
st: stitch
inc : increase
dec: decrease
sl st : slip stitch
BLO: back loop only
CC: change color
F/O: Fasten off

Materials:
3 mm crochet hook
5ply Milk cotton yarn in blue and white
Needle for sewing
Stuff
Scissors
9 mm safety eyes
black embroidery floss

Note: work in continuous round

Head and Body
Use blue
R1: ch 2, starting from second chain from hook, 6 sc (6)
R2: inc, rep 6x (12)
R3: sc, inc, rep 6x (18)
R4: sc, inc, [2 sc, inc = rep 5x], sc (24)

R5: 3 sc, inc, rep 6x (30)
R6:  2 sc, inc, [4 sc, inc = rep 5x], 2 sc (36)
R7:  5 sc, inc, rep 6x (42)
R8-15: sc around
R16: CC to white, BLO: 5 sc, dec, rep 6x (36)
R17: sc around
R18: 4 sc, dec, rep 6x (30)
R19: 3 sc, dec, rep 6x (24)
R20: sc around
R21: 2 sc, dec, rep 6x (18)
stuff
R22: sc, dec, rep 6x (12)
R23: dec, rep 6x (6)
F/O
Continue working in the front loop of R15 to make the mouth.
Use blue yarn. Start working in the 17th loop: sl st, skip 1, 5 dc in the same loop,
skip 1, sl st, skip 1, 5 dc in the same loop, skip 1, sl st
F/O
Attach eyes between R13-14. Make sure the eyes positions are above the mouth.


Tail: 
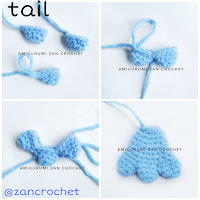
Make 3. Use blue.
R1:     ch 2, starting from second chain from hook, 6 sc (6)
R2:    sc, inc, rep 3x (9)
R3:    sc around (9)
F/O but don’t cut the the yarn of the 3rd part. We will crochet all parts together in next round.
R4: sc in next 5 sts of 3rd part, take 2nd part and sc in next 4 sts, take 1st part and sc in all sts, sc in next 5 st of 2nd part, sc in the last 4 sts of 3rd part (27 sts in total)R5:    sc, dec, rep 9x (18)
R6-7:    sc  around
R8:    4 sc, dec, rep 3x (15)
R9:     sc around
R10:    3 sc, dec, rep 3x (12)
R11:    2 sc, dec, rep 3x (9)
F/O leaving a long tail for sewing.

Ears (make 2):
Use blue
R1:     ch 2, starting from second chain from hook, 6 sc (6)
R2:    2 sc, inc, rep 2x (8)
R3:    sc around (8)
F/O leaving a long tail for sewing

Feet (make 2):
Use white
R1:     ch 2, starting from second chain from hook, 4 sc (4)
R2:    sc, inc, rep 2x (6)
R3:    sc, inc, rep 3x (9)
R4:    2 sc, inc, rep 3x (12)
R5:    2 sc, dec, rep 3x (9)
stuff
R6:    sc, dec, rep 3x (6)
F/O leaving a long tail for sewing


Finishing:

Sew the ears on the head around R9-10, give space around 8 sts between them. 

 Sew the tail onto body around R12-13. 

 Sew the leg onto body.

 Cut 6 pieces of white felt (two sets of 2 large and 1 small) and glue each set on the both side of Spheal’s body.
Cut 2 small triangle of white felt as the teeth/fangs. Glue them on the Spheals’s mouth.

Use black embroidery floss to sew Spheal’s nostrils.

Finish


This pattern is an original by me, Zan Merry. Please do not claim this pattern as your own. If you wish to share this pattern, you may link this pattern but please do not reprint it to your site or share it in a pdf or picture format.

You may keep a copy of this pattern for personal use but you may not sell the pattern. You can sell the items that you made from this pattern as you credit me as the designer.

Please leave comment if you have a question or find any mistake in my pattern. I will do the corrections as soon as possible. I will be happy to see your creation from this pattern so please share your handmade to my Facebook Page Zan Amigurumi or Instagram @zancrochet

Thanks...


Tulip

Crochet Tulip flower for beginner...
My English is not too good and i am sorry if there's a mistake in my sentences.. I hope you can understand my explanation in this pattern..
Don't forget to like my Facebook page Zan Amigurumi and follow my Instagram @zancrochet and share your creation using this pattern there.


Abbreviations:
sc: single crochet    
ch: chain
st: Stitch
inc : increase
dec: decrease
sl st : slip stitch
F/O: Fasten off
R: Round
Rep= repeat

Materials:
2 mm crochet hook
yarn in green and any color you choose to make tulip
Needle for sewing
Stuff
Scissors
Small wire

Note: Work in continuous round


Inner Petals (make 3):
R1: ch 2, starting from second chain from hook 6 sc
R2: inc, rep 6x (12)
R3: sc, inc, rep 6x (18)
R4-13: sc arund
R14: sc, dec, rep 6x (12)
R15: dec, rep 6x (6)
Leave one petal a long tail for sewing
Outside Petals (make 3):
R1: ch 2, starting from second chain from hook 6 sc
R2: inc, rep 6x (12)
R3: sc, inc, rep 6x (18)
R4: 8 sc, inc, rep 2x (20)
R5- 14: sc around
R15: 8 sc, dec, rep 2x (18)
R16: sc, dec, rep 6x (12)
R17: dec, rep 6x (6)
Leave  a long tail for sewing

Finishing:
  • Sew together all inner petals from the bottom until about half up. See a picture as a guide.
  • Sew the outside petals around the inner petals; make sure the positions of outside petals are covering the two sides of inner petals. Hold the position with small pins before sewing them.  Sew from the bottom to half up.  Join side of petals by sewing them together. Give a little sew to inner petals so the position of all petals will be the same.


Stem:
Use green
Leave a long tail for sewing before you start the chain
R1: ch 12, join them with sl st to make a ring
R2: sc in each chain st (12)
R3: sc, dec, rep 4x (8)
Join the wire to flower. Insert the wire into the stem. Sew the beginning round to tulip. Stuff
R4-52: sc around
Stuff in every 5-7 rounds you make.
R53: dec, rep 4x (8)
F/O You can add more rounds if you think the stem not long enough for you. You also can add wire after you have finished crocheting the stem. But I prefer to put it in while I crochet the stem.


Leaf:
Use green
R1: ch 2, starting from second chain from hook 4 sc
R2: inc, sc, rep 2x (6)
R3: inc, 2 sc, rep 2x (8)
R4: inc, 3 sc, rep 2x (10)
R5: inc, 4 sc, rep 2x (12)
R6: inc, 5 sc, rep 2x (14)
R7: inc, 6 sc, rep 2x (16)
R8: inc, 7 sc, rep 2x (18)
R9: sc, inc, [2 sc, inc = rep 5x], sc (24)
R10: 11 sc, inc, rep 2x (26)
R11-40: sc around
R41: 11 sc, dec, rep 2x (24)
R42: 2 sc, dec, rep 6x (18)
R43: sc, dec, rep 6x (12)
F/O leaving a long tail for sewing. Sew the hole by sewing front and back part of leaf together. Don’t cut the yarn because it will use for sewing leaf to stem.


Finishing:
Sew the leaf to stem.

This pattern is an original by me, Zan Merry. Please do not claim this pattern as your own. If you wish to share this pattern, you may link this pattern but please do not reprint it to your site. You may keep a copy of this pattern for personal use but you may not sell this pattern. You can sell the items that you made from this pattern as you credit me as the designer. Please leave comment if you have a question or find some mistake in this pattern. 
Thanks...


Amigurumi Christmas Tree

I love Christmas tree. That's why I share this pattern to you who celebrate Christmas. This free amigurumi pattern tree is so easy to crochet. You can add crochet chain on the top of this tree to hang it on your "real" Christmas tree. Just try this pattern, and I'll be glad if you share your amigurumi using this pattern to me. Happy Crocheting!! 
Materials needed:
Yarn in dark green, white and brown
2 mm crochet hook
Polyester fiberfill
Stitch marker for working in the round
Needle for sewing
Beads in various colors
Scissors

Abbreviations:
sc = single crochet
inc = increase
dec = decrease
sl st = slip stitch
dc = double crochet
hdc = half double crochet
r = round
BLO = back loops only
FO = fasten off
CC = change color

Note: This project is working in continuous rounds. Mark first stitch of each round.

Trunk:
Using brown yarn
R1: ch 2, starting from second chain from hook 6 sc
R2: inc, rep 6x (12)
R3: sc, inc, rep 6x (18)
R4: Work in BLO sc around (18)
R5-6: sc around
R7: dec, 4 sc, rep 3x (15)
R8: sc around
Stuff
F/O leave a long tail for sewing

Tree:
Using dark green and white
R1: ch 2, starting from second chain from hook 6 sc
R2: inc, sc, rep 3x (9)
R3: inc, 2sc, rep 3x (12)
R4: sc around
R5: inc, 3sc, rep 3x (15)
R6: sc around
R7: inc, 4sc, rep 3x, (18)
R8: sc around
R9: 2sc, inc, rep 6x (24)
R10: sc around
R11: 3sc, inc, rep 6x (30)
R12: Work in BLO sc around
R13-14: sc around
R15: 4sc, inc, rep 6x (36)
R16: sc around
R17: Work in BLO sc around
R18-19: sc around
R20: Work in BLO, sc around
R21: 4sc, dec, rep 6x (30)
R22: 3sc, dec, rep 6x (24)
R23: 2sc, dec, rep 6x (18)
Stuff the tree
R24: sc, dec, rep 6x (12)
R25: dec, rep 6x (6)
F/O
Sew trunk to tree before we continue the next steps. See the picture below.
Then we continue crochet next round, starting from the first front loop of R19.
R26: sc arund (36)
R27: 5sc, inc, rep 6x (42)
R28: sc around
R29: (*ch1, skip 2 st, 5dc, skip 2 st, sl st), rep * 7x, (now you have 7 shell stitches)
CC to white
R30: (*sl st to the same st of R28 that u made in R29, 2sc, inc, 2sc), rep * around
R31: Using green, working in front loop of R11, (*ch1, skip 2 st, 5dc, skip 2 st, sl st), rep * 5x (5 shell stitches)
R32:  CC to white, (*sl st to the same st of R11 that u made in R31, 2sc, inc, 2sc), rep * around
R33: Using green, workin in front loop of  R16, (*ch1, skip 2 st, 5dc, skip 2 st, sl st), rep * 6x (6 shell stitches)
R34: CC to white, (*sl st to the same st of R16 that u made in R33, 2sc, inc, 2sc), rep * around
F/O
Your Christmas tree will be like this

Star:
Using yellow yarn
R1: ch 2, starting from second chain from hook 5 sc
R2: 4ch, sl st in the  second chain from hook, sc, hdc, sl st, rep 5x
F/O leaving long tail for sewing


Finishing:
- Sew the star on the top of tree
- Sew various colors of beads to the tree as many as you like.

Now You have finished your Christmas tree. I hope you like it....
This free amigurumi Christmas tree pattern is made by me, Zan Merry. Don’t reprint it to your site or blog. You can post the ami that you made from my pattern to your blog, forum or social media, but please link me as a designer.
You can sale the ami that you’ve made from this pattern but not the pattern. If I made a mistake when wrote this pattern, please leave a comment so i can edit it. Thanks

Flower in the Pot

This is one of my favorite pattern that I've ever made... Although it's not a perfect pattern but it so easy to crochet.

For French version please click here

Please share your creation from this pattern to my page on Facebook Zan Amigurumi
 
 
Materials needed:
Cotton yarn in purple, white, green, yellow, brown, light and dark blue
2 mm crochet hook
Polyester fiberfill
Stitch marker for working in the round
Needle for sewing

Abbreviations:
sc = single crochet
inc = increase
dec = decrease
sl st = slip stitch
R= round
BLO = back loops only
FO = fasten off

Note: This project is working in continuous rounds, do not join or turn unless otherwise stated. Mark first stitch of each round.

Petals (make 10)
Start with purple
R1: 6 sc in magic ring (6)
R2: inc (repeat 6 times = 12)
R3: sc, inc (repeat 6 times = 18)
R4-10: sc around (18)
R11: sc, dec (repeat 6 times =12)
R12: sc around (12)
R13-14: change color into white, sc around (12)
FO leaving long tail for sewing.

Flower Center
With yellow.
R1: 6 sc in magic ring (6)
R2: inc (repeat 6 times = 12)
R3: sc, inc (repeat 6 times = 18)
R4: 2sc, inc (repeat 6 times = 24)
R5: 3sc, inc (repeat 6 times = 30)
R6: 4sc, inc (repeat 6 times = 36)
R7: 5sc, inc (repeat 6 times = 42)
R8-12: sc around (42)
R13: 5sc, dec (repeat 6 times = 36)
R14: 4sc, dec (repeat 6 times = 30
R15: 3sc,  dec (repeat 6 times =24)
R16: 2sc, dec (repeat 6 times =18)
Stuff firmly. Stuff little by little and form so you shape the flower center nicely.
R17: sc, dec (repeat 6 times =12)
R18: dec (repeat 6 times =6)
Fasten off

Stem
With Green
R1: 6 sc in magic ring (6)
R2: inc (repeat 6 times = 12)
R3-35: sc around
Start stuffing when you have made a few rounds of the stem (not too many though). I tend to overstuff, but when stuffing the stem don't stuff so tight the filling might shine through.

Ball of earth
Change color to brown
R36: sc, inc (repeat 6 times = 18)
R37: 2sc, inc (repeat 6 times = 24)
R38: 3sc, inc (repeat 6 times = 30)
R39: 4sc, inc (repeat 6 times = 36)
R40: 5sc, inc (repeat 6 times = 42)
R41: 6sc, inc (repeat 6 times = 48)
R42: 7sc, inc (repeat 6 times = 54)
R43: working in BLO sc around
R44-56: sc around
R57: working in BLO sc around
R58: 7sc, dec (repeat 6 times = 48)
R59: 6sc, dec (repeat 6 times = 42)
R60: 5sc, dec (repeat 6 times = 36)
R61: 4sc, dec (repeat 6 times = 30)
R62: 3sc, dec (repeat 6 times = 24)
R63: 2sc, dec (repeat 6 times = 18)
Stuff
R64: sc, dec (repeat 6 times = 12)
R65: dec around (6)
Fasten off


Leaves (make 2)
With green
R1: 6 sc in magic ring (6)
R2: sc around
R3: inc (repeat 6 times = 12)
R4: sc around
R5: sc, inc (repeat 6 times = 18)
R6: sc around
R7: 2sc, inc (repeat 6 times = 24)
R8-11: sc around
R12 : 3sc, inc (repeat 6 times = 30)
R13-14: sc around
R15: 3sc, dec (repeat 6 times = 24)
R16-18: sc around
R19: 2sc, dec (repeat 6 times = 18)
R20: sc around
R21: sc, dec ( repeat 6 times = 12)
R22-25: sc around
FO leaving long tail for sewing.

Pot
With light blue
R1: 6 sc in magic ring  (6)
R2: inc  (repeat 6 times = 12)
R3: sc, inc (repeat 6 times = 18)
R4: 2sc, inc ( repeat 6 times = 24)
R5: 3sc, inc (repeat 6 times = 30)
R6: 4sc, inc (repeat 6 times = 36)
R7: 5sc, inc (repeat 6 times = 42)
R8: 6sc, inc (repeat 6 times = 48)
R9: 7sc, inc (repeat 6 times = 54)
R10: working in BLO sc around
R11-12: sc around
R13: 8sc, inc (repeat 6 times = 60)
R14-16: sc around
Change color into dark blue
R17-25: sc around (60)
R26: turn, ch 1, sc around, sl st to first sc
R27-30: ch 1, sc around, sl st in the last stitch
FO leaving long tail for sewing.

Pot Top Edging
Fold round 29 and 30 out, then sews it to row 28. Fold it once more but don’t sew it.


Finishing
Sew petals to center between rounds 9 and 10
Sew the leaves between the ball of earth and stem. Sew them on the left and the right side. Use photo as guide.
Sew the other side of the stem to the back of  flower.
If your flower can’t stand up well you can add the wire into the stem.


Note: To make your pot have a good foundation you can add a round piece of milk carton then cover it whit crochet. Work R1-R8 of pot steps... cut the yarn and leave long tail for sewing... Sew that cover into the pot..

The flower is done... You have made it...

This pattern is an original by me, Zan Merry.  Please do not claim this pattern as your own. If you wish to share this pattern, you may link this pattern but please do not reprint it to your site. You may keep a copy of this pattern for personal use but you may not sell this pattern. You can sell the items that you made from this pattern as you credit me as the designer.
Please leave comment if you have a question or you can email me to cintaku.zanee@gmail.com
If you find some mistake in my  pattern, please tell me... I will do the corrections. I will be happy to see your creation from this pattern so please share your handmade to me...

Thanks...
sealkazzsoftware.blogspot.com resepkuekeringku.com
